Cocos2d-x 主角的登场和帧动画
主角的登场和帧动画
昨天收到了电子工业出版社寄过来的《cocos2d-x游戏开发之旅》这本书了,书还是不错的,那天rp爆发在微博上抽到的奖品。
感觉自己这个系列写的好像有点慢,但是想说尽可能把每一个点介绍到,所以,嫌啰嗦的请见谅咯。。。
我在这个游戏中对精灵和层的处理方式是一个层中只放一种精灵,把精灵的接口提供出去,然后通过层的叠加来实现整个游戏。
1.飞机登场了
飞机是Hero,所以它应该是一个单例类,cocos2d-x中有很多单例类,成员函数中有sharedxxxx的基本上就是。比如导演类,几个cache类等等。但是我这里偷个懒,并没有把它处理成单例类,因为整个游戏结构比较简单,但是在大的项目中就不能这么处理了。
和导演类的shareDirector一样,我们在PlaneLayer中也添加PlaneLayer的一个静态指针sharedPlane。但是和导演类不一样的是,必须在创建PlaneLayer后才能使用这个sharedPlane,而且在PlaneLayer销毁后就不能使用它,这里需要我们自己控制好整个流程。
    //PlaneLayer.h
    class PlaneLayer :
        public CCLayer
    {
    public:

        PlaneLayer(void);

        ~PlaneLayer(void);

        static PlaneLayer* create();//实现create函数

        virtual bool init();

    public:

        static PlaneLayer* sharedPlane;//提供sharedPlane全局指针
    };

    //PlaneLayer.cpp
    PlaneLayer* PlaneLayer::sharedPlane=NULL;//静态变量要在cpp外初始化
    PlaneLayer* PlaneLayer::create()
    {
        PlaneLayer *pRet = new PlaneLayer();
        if (pRet && pRet->init())
        {
            pRet->autorelease();
            sharedPlane=pRet;//获得静态指针sharedPlane的值
            return pRet;
        }
        else
        {
            CC_SAFE_DELETE(pRet);
            return NULL;
        }
    }
和示例不一样,这里的create我们要自己实现,而不能简单的使用LAYER_CREATE_FUNC宏了。
而这个层的使用,只需要在上一篇中的GameLayer.cpp的init函数里调用就可以了。
    //加入planeLayer
    this->planeLayer=PlaneLayer::create();
    this->addChild(planeLayer);
2.添加动画效果
细心的玩家会发现,飞机在飞行过程中机尾是在喷火的,其实这就是帧动画。
这里篇幅有限,就简单介绍下帧动画和这里用到的其他动画效果。
帧动画的使用步骤:
(1)create,创建CCAnimation类实例。
(2)setDelayPerUnit,设置帧间间隔时间。
(3)addSpriteFrame,添加帧图片。
(4)create,创建CCAnimate类实例,传入(1)的CCAnimation实例,注意CCAnimation是动画过程是名词,CCAnimate才是动画动作。
(5)精灵调用runAction即可使用。
(6)注意CCAnimationCache这也是一个动画类全局缓冲池。如果大量重复动画可以放里面使用,加快游戏速度。
    bool PlaneLayer::init()
    {
        bool bRet=false;
        do
        {
            CC_BREAK_IF(!CCLayer::init());

            CCSize winSize=CCDirector::sharedDirector()->getWinSize();

            //创建飞机精灵前要先调用CCSpriteFrameCache::sharedSpriteFrameCache()->addSpriteFramesWithFile("shoot.plist");加载全局资源
            //我把这个调用plist放到welcome.cpp中了。不然plane会空指针。
            CCSprite* plane=CCSprite::create(CCSpriteFrameCache::sharedSpriteFrameCache()->spriteFrameByName("hero1.png"));
            plane->setPosition(ccp(winSize.width/2,plane->getContentSize().height/2));//飞机放置在底部中央
            this->addChild(plane,0,AIRPLANE);//添加精灵,AIRPLANE是tag

            CCBlink *blink=CCBlink::create(1,3);//闪烁动画

            CCAnimation* animation=CCAnimation::create();
            animation->setDelayPerUnit(0.1f);
            animation->addSpriteFrame(CCSpriteFrameCache::sharedSpriteFrameCache()->spriteFrameByName("hero1.png"));
            animation->addSpriteFrame(CCSpriteFrameCache::sharedSpriteFrameCache()->spriteFrameByName("hero2.png"));
            CCAnimate* animate=CCAnimate::create(animation);//帧动画

            plane->runAction(blink);//执行闪烁动画
            plane->runAction(CCRepeatForever::create(animate));// 执行帧动画

            bRet=true;
        } while (0);

        return bRet;
    }
那这些CCBlink,CCRepeaterForever又是什么?
这就是cocos2d-x提供的一些动画效果,其实用起来都很简单,无非是设置duration持续时长,repeat重复次数,和一些位移的坐标点,角度等等,就可以直接运行。可以在cocos2d-x的test示例中找到。
3.添加飞机到场景
给GameLayer层添加成员变量PlaneLayer型指针,在GameLayer::init()中调用PlaneLayer的create函数初始化飞机层。
    bool GameLayer::init()
    {
        bool bRet=false;
        do
        {
            ...省略代码

            //加入planeLayer
            this->planeLayer=PlaneLayer::create();
            this->addChild(planeLayer);

            ...省略代码

            bRet=true;
        } while (0);
        return bRet;
    }
4.飞机层PlaneLayer的其他属性和接口
(1)成员变量bool型isAlive,作为判断飞机主角是否活着的标志,初始为true。
(2)成员变量int型score,作为分数,出师为0,最高为20亿。
(3)void MoveTo(CCPoint location);飞机层移动的方法。主要是用于触摸飞机移动。会在[第七篇:触摸事件和优先级][1]有介绍。
(4)void Blowup(int passScore);飞机爆炸方法。当主角碰到炸弹死亡后执行爆炸动画效果。在[第八篇:自定义敌机精灵][2]有介绍。
(5)void RemovePlane();移除飞机并转换至GameOver场景。
以上这几个方法和属性在后面文章中会有介绍。
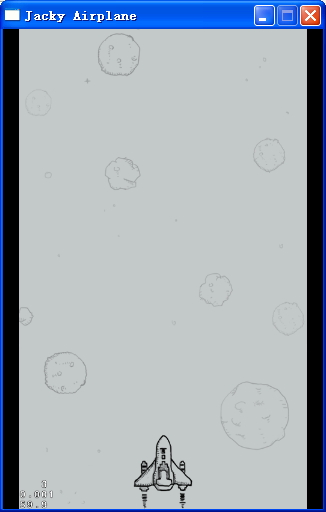
现在飞机出现了,在一开始闪烁3次以后,结合上篇的背景滚动,飞机看起来就像是在喷气往前飞了,当然飞机相对屏幕的位置还是不变的(底部中央)。。。吼吼。。。
效果图
