
Core Data by tutorials 笔记(四)
原文出处: http://chengway.in/post/ji-zhu/core-data-by-tutorials-bi-ji-si
Raywenderlich家《Core Data by Tutorials》这本书到此为止已经回顾过半,今天来学习一下第六章“版本迁移”。第六章也是本书篇幅最多的。根据数据模型的每一次的调整程度,数据迁移都有可能会变得更加复杂。最后,迁移数据所花的成本甚至超过了所要实现的功能。那么前期完善对Model的设计将会变得十分重要,这一切都需要开发者去权衡。
Chapter 6: Versioning and Migration
本章提供了一个记事本APP,未来数据结构要变更,迁移(migration)过程就是:在旧data model的基础上将数据迁移到新的data model中来。
一、When to migrate
如果仅仅是把Core data当做是离线缓存用,那么下次update的时候,丢弃掉就OK了。但是,如果是需要保存用户的数据,在下个版本仍然能用,那么就需要迁移数据了,具体操作是创建一个新版本的data model,然后提供一个迁移路径(migration path)。
二、The migration process
在创建Core Data stack的时候,系统会在添加store到persistent store coordinator之前分析这个store的model版本,接着与coordinator中的data model相比较,如果不匹配,那么Core Data就会执行迁移。当然,你要启用允许迁移的选项,否则会报错。
具体的迁移需要源data model和目的model,根据这两个版本的model创建mapping model,mapping model可以看做是迁移所需要的地图。
迁移主要分三步:
- Core Data拷贝所有的对象从一个data store到另一个。
- Core Data根据relationship mapping重建所有对象的关系
- 在destination model开启数据有效性验证,在此之前的copy过程中是被disable了。
这里不用担心出错,Core Data只有迁移成功,才会删除原始的data store数据。
作者根据日常经验将迁移划分为四种:
- Lightweight migrations
- Manual migrations
- Manual migrations
-
Fully manual migrations
第一种是苹果的方式,你几乎不用做什么操作,打开选项迁移就会自动执行。第二种需要设置一个mapping model类似与data model,也是全GUI操作没什么难度。第三种,就需要你在第二种的基础上自定义迁移策略(NSEntityMigrationPolicy)供mapping model选择。最后一种考虑的是如何在多个model版本中跨版本迁移,你要提供相应的判定代码。
三、A lightweight migration
所谓轻量级的迁移就是给Note实体增加了一个image的属性。要做的步骤也很简单:
- 在上一model基础上创建UnCloudNotesDataModel v2,然后添加image属性。
- 启用Core Data自动迁移选项,这个选项在.addPersistentStoreWithType方法中开启
作者的做法是在CoreDataStack初始化的时候传入这个options数组参数,然后再传递给.addPersistentStoreWithType方法。
init(modelName: String, storeName: String,
    options: NSDictionary? = nil) {
        self.modelName = modelName
        self.storeName = storeName
        self.options = options
}
store = coordinator.addPersistentStoreWithType(
    NSSQLiteStoreType, configuration: nil,
    URL: storeURL,
    options: self.options,
    error: nil)
lazy var stack : CoreDataStack = CoreDataStack(
    modelName:"UnCloudNotesDataModel",
    storeName:"UnCloudNotes",
    options:[NSMigratePersistentStoresAutomaticallyOption: true,
NSInferMappingModelAutomaticallyOption: true])NSMigratePersistentStoresAutomaticallyOption是自动迁移选项,而NSInferMappingModelAutomaticallyOption是mapping model自动推断。所有的迁移都需要mapping model,作者也把mapping model比作是向导。紧接着列出了可以应用自动推断的一些模式,基本上都是对实体、属性的增、删、改以及关系的修改。
- Deleting entities, attributes or relationships;
- Renaming entities, attributes or relationships using the renamingIdentifier;
- Adding a new, optional attribute;
- Adding a new, required attribute with a default value;
- Changing an optional attribute to non-optional and specifying a default value;
- Changing a non-optional attribute to optional;
- Changing the entity hierarchy;
- Adding a new parent entity and moving attributes up or down the hierarchy;
- Changing a relationship from to-one to to-many;
- Changing a relationship from non-ordered to-many to ordered to-many (and vice versa).
所以正确的做法就是任何数据迁移都应先从自动迁移开始,如果搞不定才需要手动迁移。
四、A manual migration
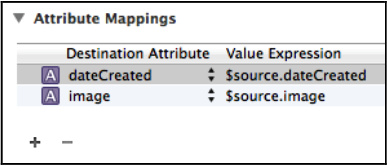
- 与lightweight migration相同,首先要创建一个UnCloudNotesDataModel v3,这次需要添加一个新Entity,命名为Attachment,并给该Entity添加两个属性dateCreated、image。将Note和Attachment的关系设为一对多,即一个note会有多个attachment。
- 创建一个mapping model,命名为UnCloudNotesMappingModel_v2_to_v3
-
修改mapping model,分为Attribute Mappings和Relationship Mappings
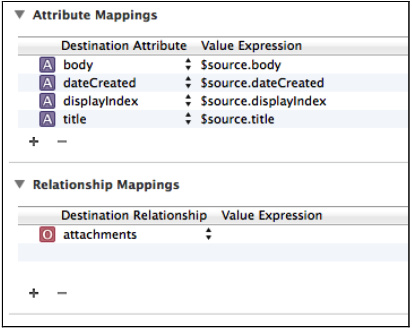
上图是实体Note的mapping model,这里的source指的是源数据模型(data model)里的Note实体,创建新加实体Attachment的mapping model也很简单,在Entity Mapping inspector里将source entity改为Note,接着实体Attachment的属性dateCreated、image就来自于上一版data model里的Note实体。
在Mapping model中可以添加过滤条件,比如设置NoteToAttachment的Filter Predicate为image != nil,也就是说Attachment的迁移只有在image存在的情况下发生。
-
Relationship mapping,这里要注意的一点就是实体Note与Attachment的关系是在UnCloudNotesDataModel v3这一版本中添加的,所以我们需要的destination relationship其实就是UnCloudNotesDataModel v3中的relationship。于是我们这样获得这段关系

作者这里展示了这个表达式函数:
FUNCTION($manager, "destinationInstancesForEntityMappingNamed:sourceInstances:", "NoteToNote", $source) -
最后需要更改之前CoreData的options设置
options:[NSMigratePersistentStoresAutomaticallyOption:true,
    NSInferMappingModelAutomaticallyOption:false]
将自动推断mapping model关掉,因为我们已经自定义了mapping model。
五、A complex mapping model
- 创建一个UnCloudNotesDataModel v4的版本,在v3的版本上增加一个Entity,命名为ImageAttachment,设为Attachment的子类。接着为这个新的ImageAttachment添加caption、width、height三个属性,移除Attachment中的image。这样就为今后支持videos、audio做好了扩展准备。
-
添加UnCloudNotesMappingModel_v3_to_v4,和上一节类似,NoteToNote mapping和AttachmentToAttachment mappingXcode已经为我们设置OK了,我们只需关注AttachmentToImageAttachment,修改他的$source为Attachment
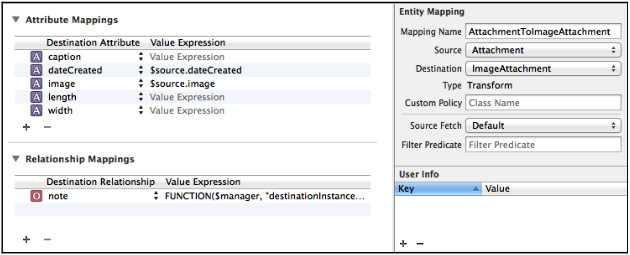
除了从父类Attachment继承而来的属性,新添加的三个属性都没有mapping,我们用代码来实现吧。
-
除了mapping model中的FUNCTION expressions,我们还可以自定义migration policies。增加一个NSEntityMigrationPolicy类的swift文件命名为AttachmentToImageAttachmentMigrationPolicyV3toV4,覆盖NSEntityMigrationPolicy初始化方法:
class AttachmentToImageAttachmentMigrationPolicyV3toV4: NSEntityMigrationPolicy { override func createDestinationInstancesForSourceInstance( sInstance: NSManagedObject, entityMapping mapping: NSEntityMapping, manager: NSMigrationManager, error: NSErrorPointer) -> Bool { // 1 创建一个新destination object let newAttachment = NSEntityDescription.insertNewObjectForEntityForName("ImageAttachment", inManagedObjectContext: manager.destinationContext) as NSManagedObject // 2 在执行手动migration之前,先执行mapping model里定义的expressions for propertyMapping in mapping.attributeMappings as [NSPropertyMapping]! { let destinationName = propertyMapping.name! if let valueExpression = propertyMapping.valueExpression { let context: NSMutableDictionary = ["source": sInstance] let destinationValue: AnyObject = valueExpression.expressionValueWithObject(sInstance, context: context) newAttachment.setValue(destinationValue, forKey: destinationName) } } // 3 从这里开始才是custom migration,从源object得到image的size if let image = sInstance.valueForKey("image") as? UIImage { newAttachment.setValue(image.size.width, forKey: "width") newAttachment.setValue(image.size.height, forKey: "height") } // 4 得到caption let body = sInstance.valueForKeyPath("note.body") as NSString newAttachment.setValue(body.substringToIndex(80), forKey: "caption") // 5 manager作为迁移管家需要知道source、destination与mapping manager.associateSourceInstance(sInstance, withDestinationInstance: newAttachment, forEntityMapping: mapping) // 6 成功了别忘了返回一个bool值 return true } }这样就定义了一个自定义迁移policy,最后别忘了在AttachmentToImageAttachment的Entity Mapping Inspector里Custom Policy那一栏填入我们上面创建的这个UnCloudNotes.AttachmentToImageAttachmentMigrationPolicyV3toV4。
六、Migrating non-sequential versions
如果存在多个版本非线性迁移,也就是可能从V1直接到V3或V4...这又该怎么办呢,这节代码比较多,说下思路,就不全帖出来了。
- 创建一个DataMigrationManager,这个类有一个stack属性,由他来负责提供合适的migrated Core Data stack。为了分清各个版本,这个manager初始化需要传入store name和model name两个参数。
-
扩展NSManagedObjectModel,创建两个类方法:
    class func modelVersionsForName(name: String) -> [NSManagedObjectModel]
class func uncloudNotesModelNamed(name: String) -> NSManagedObjectModel
前者根据model名称返回所有版本的model,后者返回一个指定的Model实例。
When Xcode compiles your app into its app bundle, it will also compile your data models. The app bundle will have at its root a .momd folder that contains .mom files. MOM or Managed Object Model files are the compiled versions of .xcdatamodel files. You’ll have a .mom for each data model version.
-
根据上面扩展的方法,继续对NSManagedObjectModel进行扩展,创建几个比较版本的handle method,例如:
class func version2() -> NSManagedObjectModel {
    return uncloudNotesModelNamed("UnCloudNotesDataModel v2")
}
func isVersion2() -> Bool {
    return self == self.dynamicType.version2()
}
直接使用“==”比较当然是不行的,这里继续对“==”改写一下,有同样的entities就判定相等:
func ==(firstModel:NSManagedObjectModel, otherModel:NSManagedObjectModel) -> Bool { let myEntities = firstModel.entitiesByName as NSDictionary let otherEntities = otherModel.entitiesByName as NSDictionary return myEntities.isEqualToDictionary(otherEntities) } -
增加store和model是否匹配的判断方法,这里主要用NSPersistentStoreCoordinator的metadataForPersistentStoreOfType方法返回一个metadata,然后再用model的isConfiguration方法对这个metadata进行判断,来决定model和persistent store是否匹配。
-
添加两个计算属性,storeURL和storeModel,storeModel遍历所有的model,通过第4步的判断方法找出相匹配的storeModel。
-
修改stack的定义:先判断,store与model不相容,就先执行迁移。
var stack: CoreDataStack { if !storeIsCompatibleWith(Model: currentModel) { performMigration() } return CoreDataStack(modelName: modelName, storeName: storeName, options: options) } -
自定义一个迁移方法,将store URL、source model、destination model和可选的mapping model作为参数,这就是完全手动实现迁移的方法。如果做轻量级的迁移,将最后一个mapping model设为nil,那么使用本方法和系统实现没有差别。
func migrateStoreAt(URL storeURL:NSURL, fromModel from:NSManagedObjectModel, toModel to:NSManagedObjectModel, mappingModel:NSMappingModel? = nil) { //...... } -
最后我们来实现第6步提到的performMigration方法,现在最新的版本是v4,开始之前先做个判断,当前model的最新版本为v4,才执行这个performMigration方法下面的内容:
if !currentModel.isVersion4() {
    fatalError("Can only handle migrations to version 4!")
}
这样就变成了从v1 -> v4,v2 -> v4,v3 -> v4的迁移,接下来的方法也很简单,分别判断storeModle的版本号,执行第7步的migrateStoreAt:方法,并且通过对performMigration方法的递归调用来最终迁移到v4版本。
作者最后还给了两条建议:
- 尽量可能采取最简单的迁移方式,因为迁移很难测试。
- 每个版本都尽量保存一点数据以便将来迁移时可以测试。