Canvas入门基础(二):颜色、样式和阴影
- 设置图形的填充颜色。
fillStyle = color
- 设置图形轮廓的颜色。
color 可以是表示 CSS 颜色值的字符串,渐变对象或者图案对象。后面我们会详细渐变和图案对象。默认情况下,线条和填充颜色都是黑色(CSS 颜色值 #000000)。strokeStyle = color
注意: 一旦您设置了 strokeStyle 或者 fillStyle 的值,那么这个新值就会成为新绘制的图形的默认值。如果你要给每个图形上不同的颜色,你需要重新设置 fillStyle 或 strokeStyle 的值。
例子:
for (var i=1;i<6;i++){
    for (var j=1;j<6;j++){
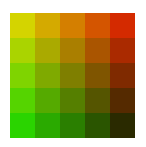
      cxt.fillStyle = 'rgb(' + Math.floor(255-42.5*i) + ',' +  Math.floor(255-42.5*j) + ',0)';
      cxt.fillRect(j*25,i*25,25,25);
    }
  }
二、线型的样式
- 设置线条宽度。
lineWidth = value
例子:
cxt.strokeStyle="#e78170";
for (var i = 0; i < 10; i++){
   cxt.lineWidth = 1+i;
   cxt.beginPath();
   cxt.moveTo(25+i*14,25);
   cxt.lineTo(25+i*14,140);
   cxt.stroke();
 }
- 设置线条末端样式。
有三个值:
butt
线段末端以方形结束。
round
线段末端以圆形结束。
square
线段末端以方形结束,但是增加了一个宽度和线段相同,高度是线段厚度一半的矩形区域。
- 设定线条与线条间接合处的样式。
此属性有3个值: round, bevel and miter。默认值是 miter。注意:如果2个相连部分在同一方向,那么lineJoin不会产生任何效果,因为在那种情况下不会出现连接区域。
round
通过填充一个额外的,圆心在相连部分末端的扇形,绘制拐角的形状。 圆角的半径是线段的宽度。
bevel
在相连部分的末端填充一个额外的以三角形为底的区域, 每个部分都有各自独立的矩形拐角。
miter
通过延伸相连部分的外边缘,使其相交于一点,形成一个额外的菱形区域。这个设置可以通过 miterLimit 属性看到效果
- 限制当两条线相交时交接处最大长度;所谓交接处长度(斜接长度)是指线条交接处内角顶点到外角顶点的长度。
- 返回一个包含当前虚线样式,长度为非负偶数的数组。
- 设置当前虚线样式。
- 设置虚线样式的起始偏移量。
三、渐变Gradients
我们还可以用线性或者径向的渐变来填充或描边
- 线性渐变
createLinearGradient(x1, y1, x2, y2) createLinearGradient 方法接受 4 个参数,表示渐变的起点 (x1,y1) 与终点 (x2,y2)。
- 径向渐变
创建出 canvasGradient 对象后,我们就可以用 addColorStop 方法给它上色了。
- gradient.addColorStop(position, color)
var linearGradient=cxt.createLinearGradient(50,50,250,250);
  linearGradient.addColorStop(0,'yellow');
  linearGradient.addColorStop(.5,'red');
  linearGradient.addColorStop(1,'green');
  cxt.fillStyle=linearGradient;
  cxt.fillRect(50,50,200,200);
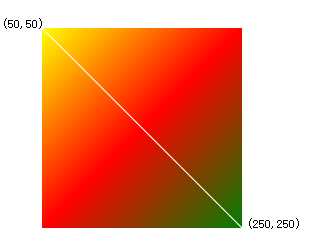
从上图看,(50,50)是渐变的起点,(250,250)是渐变的终点,而连接这两点的白线,就是渐变的方向。
径向渐变
同心渐变
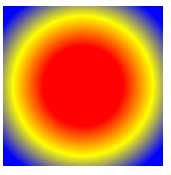
var rr=cxt.createRadialGradient(100,100,40,100,100,100);
  rr.addColorStop(0,'red');
  rr.addColorStop(.5,'yellow');
  rr.addColorStop(1,'blue');
  cxt.fillStyle=rr;
  cxt.fillRect(20,20,160,160);
  cxt.fill();
不同心但外圆包含内圆
var rr2=cxt.createRadialGradient(250,250,20,260,260,50);
  rr2.addColorStop(0,'red');
  rr2.addColorStop(.5,'yellow');
  rr2.addColorStop(1,'blue');
  cxt.fillStyle=rr2;
  cxt.fillRect(50,50,400,400);
  cxt.fill();
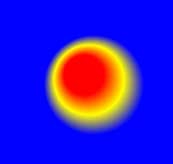
不同心,外圆内圆分离
var rr3=cxt.createRadialGradient(250,250,30,350,250,50);
  rr3.addColorStop(0,'red');
  rr3.addColorStop(.8,'yellow');
  rr3.addColorStop(1,'blue');
  cxt.fillStyle=rr3;
  cxt.fillRect(100,100,300,300);

四、图案样式 Patterns
createPattern(image, type)
该方法接受两个参数。Image 可以是一个 Image 对象的引用,或者另一个 canvas 对象。Type 必须是下面的字符串值之一:repeat,repeat-x,repeat-y 和 no-repeat。
例子:
       var img=new Image();
  img.src="diamond.png";
  img.onload=function(){
    var ptrn=cxt.createPattern(img,'repeat');
    cxt.fillStyle=ptrn;
    cxt.fillRect(250,250,80,80);
  }
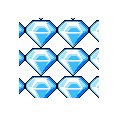
注意:使用 Image 对象的 onload handler 来确保设置图案之前图像已经装载完毕。
五、阴影 Shadows
shadowOffsetX = float shadowOffsetX 和 shadowOffsetY 用来设定阴影在 X 和 Y 轴的延伸距离,它们是不受变换矩阵所影响的。负值表示阴影会往上或左延伸,正值则表示会往下或右延伸,它们默认都为 0。 shadowOffsetY = float shadowOffsetX 和 shadowOffsetY 用来设定阴影在 X 和 Y 轴的延伸距离,它们是不受变换矩阵所影响的。负值表示阴影会往上或左延伸,正值则表示会往下或右延伸,它们默认都为 0。 shadowBlur = float shadowBlur 用于设定阴影的模糊程度,其数值并不跟像素数量挂钩,也不受变换矩阵的影响,默认为 0。 shadowColor = color shadowColor 是标准的 CSS 颜色值,用于设定阴影颜色效果,默认是全透明的黑色。
例子:
var img=new Image();
img.src="mm.jpg";
img.onload=function(){
  cxt.shadowOffsetX=10;
  cxt.shadowOffsetY=10;
  cxt.shadowBlur=8;
  cxt.shadowColor="#333";
  cxt.drawImage(img,10,10);
}

六、Canvas 填充规则
当我们用到 fill(或者 clip和isPointinPath )你可以选择一个填充规则,该填充规则根据某处在路径的外面或者里面来决定该处是否被填充,这对于自己与自己路径相交或者路径被嵌套的时候是有用的。
两个可能的值:
"nonzero": 默认值.
"evenodd":
cxt.beginPath();
  cxt.arc(100,100,50,0,Math.PI*2,true);
  cxt.arc(100,100,20,0,Math.PI*2,true);
  cxt.fill("evenodd");
