
Django drf 概要和客户端库
概要是一种机器可读文档,用于描述可用的API路径,其URLS以及它们支持的操作。
概要可以是自动生成文档的有用工具,也可以用于驱动可以与API进行交互的动态客户端库。
Core API
为了提供概要支持REST框架使用Core API。
Core API是用于描述API的文档规范。它用于提供可用路径的内部表示形式和API公开的可能的交互。它可以用于服务器端或客户端。
当使用服务器端时,coreAPI允许API支持呈现范围广泛的概要或超媒体格式。
当使用客户端时,核心API允许动态驱动的客户端库,它可以与任何公开受支持的概要或超媒体格式的API交互。
添加概要
REST框架支持明确定义的概要视图或自动生成的概要。由于我们使用的是视图集和路由器,我们可以简单地使用自动概要生成。
你需要安装coreapi python包才能包含API概要。
$ pip install coreapi现在我们可以通过在URL配置中包含一个自动生成的概要视图来为API添加概要。
from rest_framework.schemas import get_schema_view
schema_view = get_schema_view(title='Pastebin API')
urlpatterns = [
url('^schema/$', schema_view),
...
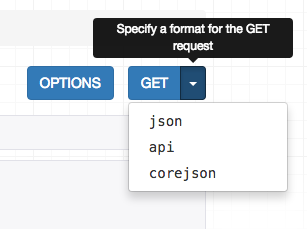
]如果你在浏览器中访问API根路径,那么你现在应该可以看到corejson表示形式是一个可用选项。
我们也可以通过在Accept标头中指定所需的内容类型从命令行请求概要。
$ http http://127.0.0.1:8000/schema/ Accept:application/coreapi+json
HTTP/1.0 200 OK
Allow: GET, HEAD, OPTIONS
Content-Type: application/coreapi+json

{
    "_meta": {
        "title": "Pastebin API"
    },
    "_type": "document",
...默认输出样式是使用Core JSON编码。
还支持其他概要格式,如Open API(以前叫Swagger)。
使用命令行客户端
现在我们的API暴露了一个概要路径,我们可以使用一个动态的客户端库与API进行交互。为了演示这个,我们来使用Core API命令行客户端。
命令行客户端作为一个coreapi-cli包提供:
$ pip install coreapi-cli现在检查它在命令行上是否可用...
$ coreapi
Usage: coreapi [OPTIONS] COMMAND [ARGS]...

  Command line client for interacting with CoreAPI services.

  Visit http://www.coreapi.org for more information.

Options:
  --version  Display the package version number.
  --help     Show this message and exit.

Commands:
...
首先,我们将使用命令行客户端加载API概要。
$ coreapi get http://127.0.0.1:8000/schema/
<Pastebin API "http://127.0.0.1:8000/schema/">
    snippets: {
        highlight(id)
        list()
        read(id)
    }
    users: {
        list()
        read(id)
    }
我们还没有认证,所以现在我们只能看到只读路径,这与我们设置的API权限是一致的。
我们使用命令行客户端,尝试列出现有的代码片段:
$ coreapi action snippets list
[
    {
        "url": "http://127.0.0.1:8000/snippets/1/",
        "id": 1,
        "highlight": "http://127.0.0.1:8000/snippets/1/highlight/",
        "owner": "lucy",
        "title": "Example",
        "code": "print('hello, world!')",
        "linenos": true,
        "language": "python",
        "style": "friendly"
    },
    ...
一些API路径需要命名参数。例如,要获取特定代码片段的高亮HTML表示,我们需要提供一个id。
$ coreapi action snippets highlight --param id=1
<!DOCTYPE html PUBLIC "-//W3C//DTD HTML 4.01//EN" "http://www.w3.org/TR/html4/strict.dtd">

<html>
<head>
  <title>Example</title>
  ...
验证我们的客户端
如果我们想要创建,编辑和删除代码片段,我们需要进行有效性用户身份验证。在这种情况下,我们只需使用基本的auth。
请确保使用实际的用户名和密码替换下面的<username>和<password>。
$ coreapi credentials add 127.0.0.1 <username>:<password> --auth basic
Added credentials
127.0.0.1 "Basic <...>"
现在,如果我们再次提取概要,我们应该能够看到一组可用的交互。
$ coreapi reload
Pastebin API "http://127.0.0.1:8000/schema/">
    snippets: {
        create(code, [title], [linenos], [language], [style])
        delete(id)
        highlight(id)
        list()
        partial_update(id, [title], [code], [linenos], [language], [style])
        read(id)
        update(id, code, [title], [linenos], [language], [style])
    }
    users: {
        list()
        read(id)
    }
我们现在能够与这些路径行交互。例如,要创建一个新的代码片段:
$ coreapi action snippets create --param title="Example" --param code="print('hello, world')"
{
    "url": "http://127.0.0.1:8000/snippets/7/",
    "id": 7,
    "highlight": "http://127.0.0.1:8000/snippets/7/highlight/",
    "owner": "lucy",
    "title": "Example",
    "code": "print('hello, world')",
    "linenos": false,
    "language": "python",
    "style": "friendly"
}
然后删除一个代码片段:
$ coreapi action snippets delete --param id=7除了命令行客户端,开发人员还可以使用客户端库与你的API进行交互。Python客户端库是第一个可用的库,并且计划即将发布一个Javascript客户端库。
有关定制模式生成和使用Core API客户端库的更多详细信息,您需要参考完整的文档。
回顾我们所做的
使用非常少的代码,我们现在有一个代码收集系统的webAPI,它是完全的浏览器可浏览的,包括一个概要驱动的客户端库和带有身份验证、每个对象的权限控制和多个渲染器格式支持。
我们已经走过了设计过程的每个步骤,并且看到如果我们需要自定义任何东西,我们都可以按部就班的简单地使用常规的Django视图实现。
你可以查看GitHub上的最终教程代码,或者尝试下沙箱中的实例。
越来越成功
我们已经完成了我们的教程。如果你想要更多地参与到REST框架项目中,以下是你可以开始的几个地方:
- 通过审查和提交问题,并pull requests,为GitHub做出贡献。
- 加入REST framework 讨论组,并帮助构建社区。
- 在Twitter成为作者的粉丝,并打个招呼。
现在就去构建非常棒的东西吧。