简单应用举例(1)
1 Hello world
这个例子里,2个输入框都被绑定到data model上的observable变量上。“full name”显示的是一个dependent observable,它的值是前面2个输入框的值合并一起的结果。

无论哪个输入框更新,都会看到“full name” 显示结果都会自动更新。查看HTML源代码可以看到我们不需要声明onchange事件。Knockout知道什么时候该更新UI。
代码: View
<p>First name: <input data-bind="value: firstName"/></p>
<p>Last name: <input data-bind="value: lastName"/></p>
<h2>Hello, <span data-bind="text: fullName"> </span>!</h2>代码: View model
// 这里是声明的view model

var viewModel = {
    firstName: ko.observable("Planet"),
    lastName: ko.observable("Earth")
};

viewModel.fullName = ko.dependentObservable(function () {
    // Knockout tracks dependencies automatically.
    //It knows that fullName depends on firstName and lastName,
    //because these get called when evaluating fullName.
    return viewModel.firstName() + " " + viewModel.lastName();
});

ko.applyBindings(viewModel); // This makes Knockout get to work
2 Click counter
这个例子展示的创建一个view model并且绑定各种绑定到HTML元素标记上,以便展示和修改view model的状态。
Knockout根据依赖项。在内部,hasClickedTooManyTimes在numberOfClicks上有个订阅,以便当numberOfClicks改变的时候,强制hasClickedTooManyTimes重新执行。相似的,UI界面上多个地方引用hasClickedTooManyTimes,所以当hasClickedTooManyTimes 改变的时候,也讲导致UI界面更新。
不需要手工声明或者订阅这些subscription订阅,他们由KO框架自己创建和销毁。参考如下代码实现:

代码: View
<div>You've clicked <span data-bind="text: numberOfClicks"> </span> times</div>
<button data-bind="click: registerClick, enable: !hasClickedTooManyTimes()">Click me</button>
<div data-bind="visible: hasClickedTooManyTimes">
That's too many clicks! Please stop before you wear out your fingers.
<button data-bind="click: function() { numberOfClicks(0) }">Reset clicks</button>
</div>代码: View model
var clickCounterViewModel = function () {
    this.numberOfClicks = ko.observable(0);

    this.registerClick = function () {
        this.numberOfClicks(this.numberOfClicks() + 1);
    }

    this.hasClickedTooManyTimes = ko.dependentObservable(function () {
        return this.numberOfClicks() >= 3;
    }, this);
};

ko.applyBindings(new clickCounterViewModel());
3 Simple list
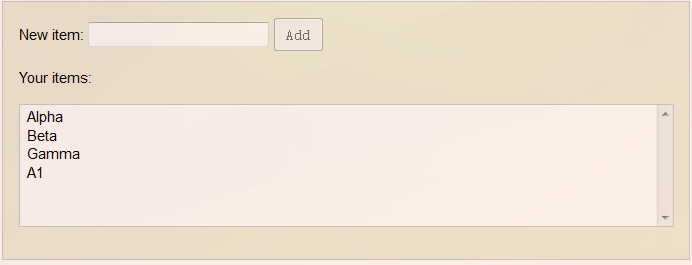
这个例子展示的是绑定到数组上。
注意到,只有当你在输入框里输入一些值的时候,Add按钮才可用。参考下面的HTML代码是如何使用enable 绑定。

代码: View
<form data-bind="submit: addItem">
    New item:
    <input data-bind='value: itemToAdd, valueUpdate: "afterkeydown"' />
    <button type="submit" data-bind="enable: itemToAdd().length > 0">Add</button>
    <p>Your items:</p>
    <select multiple="multiple" width="50" data-bind="options: items"> </select>
</form>代码: View model
var viewModel = {};
viewModel.items = ko.observableArray(["Alpha", "Beta", "Gamma"]);
viewModel.itemToAdd = ko.observable("");
viewModel.addItem = function () {
    if (viewModel.itemToAdd() != "") {
        viewModel.items.push(viewModel.itemToAdd());
        // Adds the item. Writing to the "items" observableArray causes any associated UI to update.

        viewModel.itemToAdd("");
        // Clears the text box, because it's bound to the "itemToAdd" observable
    }
}

ko.applyBindings(viewModel);
4 Better list
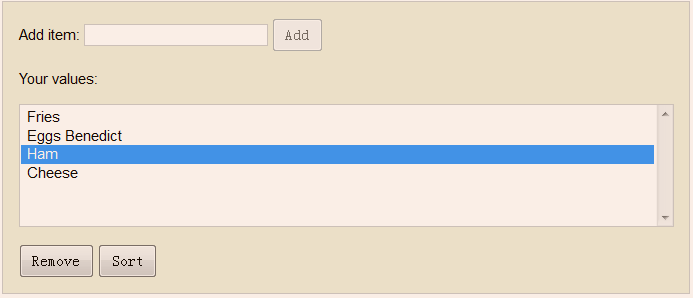
这个例子是在上个例子的基础上添加remove item功能(multi-selection)和排序功能。 “remove”和“sort”按钮在不能用的时候会变成disabled状态(例如,没有足够的item来排序)。
参考HTML代码是如何实现这些功能的,另外这个例子也展示了如何使用匿名函数来实现排序。

代码: View
<form data-bind="submit:addItem">
    Add item: <input type="text" data-bind='value:itemToAdd, valueUpdate: "afterkeydown"' />
    <button type="submit" data-bind="enable: itemToAdd().length > 0">Add</button>
</form>

<p>Your values:</p>
<select multiple="multiple" height="5" data-bind="options:allItems, selectedOptions:selectedItems"> </select>

<div>
    <button data-bind="click: removeSelected, enable: selectedItems().length > 0">Remove</button>
    <button data-bind="click: function() { allItems.sort() }, enable: allItems().length > 1">Sort</button>
</div>代码: View model
// In this example, betterListModel is a class, and the view model is an instance of it.

// See simpleList.html for an example of how to construct a view model without defining a class for it. Either technique works fine.

var betterListModel = function () {
    this.itemToAdd = new ko.observable("");
    this.allItems = new ko.observableArray(["Fries", "Eggs Benedict", "Ham", "Cheese"]);

// Initial items

this.selectedItems = new ko.observableArray(["Ham"]);

// Initial selection

    this.addItem = function () {
        if ((this.itemToAdd() != "") && (this.allItems.indexOf(this.itemToAdd()) < 0))
    // Prevent blanks and duplicates
        this.allItems.push(this.itemToAdd());
        this.itemToAdd(""); // Clear the text box
    }

    this.removeSelected = function () {
        this.allItems.removeAll(this.selectedItems());
        this.selectedItems([]); // Clear selection
    }
};

ko.applyBindings(new betterListModel());