
从零开始

前言
搭建此博客是因为通过github上了解到github pages进而知道了可以把静态网页博客托管给github仓库 或许您已经通Git + Hexo 搭建个人博客网站了解到如何通过HEXO + GIT 实现个人博客网站的建立。但是尽管您已经成功建立博客网站,但是你需要对网站做合适的配置和调整才能迎合你的网站要求。本文主要介绍HEXO的基本操作命令和网站的基本配置方法。
github pages介绍
Github Pages 是 github 公司提供的免费的静态网站托管服务,用起来方便而且功能强大,不仅没有空间限制(为免费用户提供了500M空间),还可以绑定自己的域名。
到 https://pages.github.com/ 上,看到可以创建的网站有两类,一类是为自己或者是自己的组织创建站点,就是新建一个仓库,仓库的名字叫做,username.github.io 或者是 orgnizationname.github.io ,注意这里的 username 和 orgnizationname 要严格替换成你自己的用户名或者组织名,大小写也要区分,不然就会有问题。然后就往仓库里面放页面内容就行了。第二类是为项目创建网站,这个其实主要步骤都是一样的,只不过稍微比创建用户或组织网站复杂一点点。


 具体的可以看这个网址的讲解Github Pages
域名注册和绑定
我是在万网注册的域名和设置DNS解析,所以我只会讲在阿里云下的域名绑定。
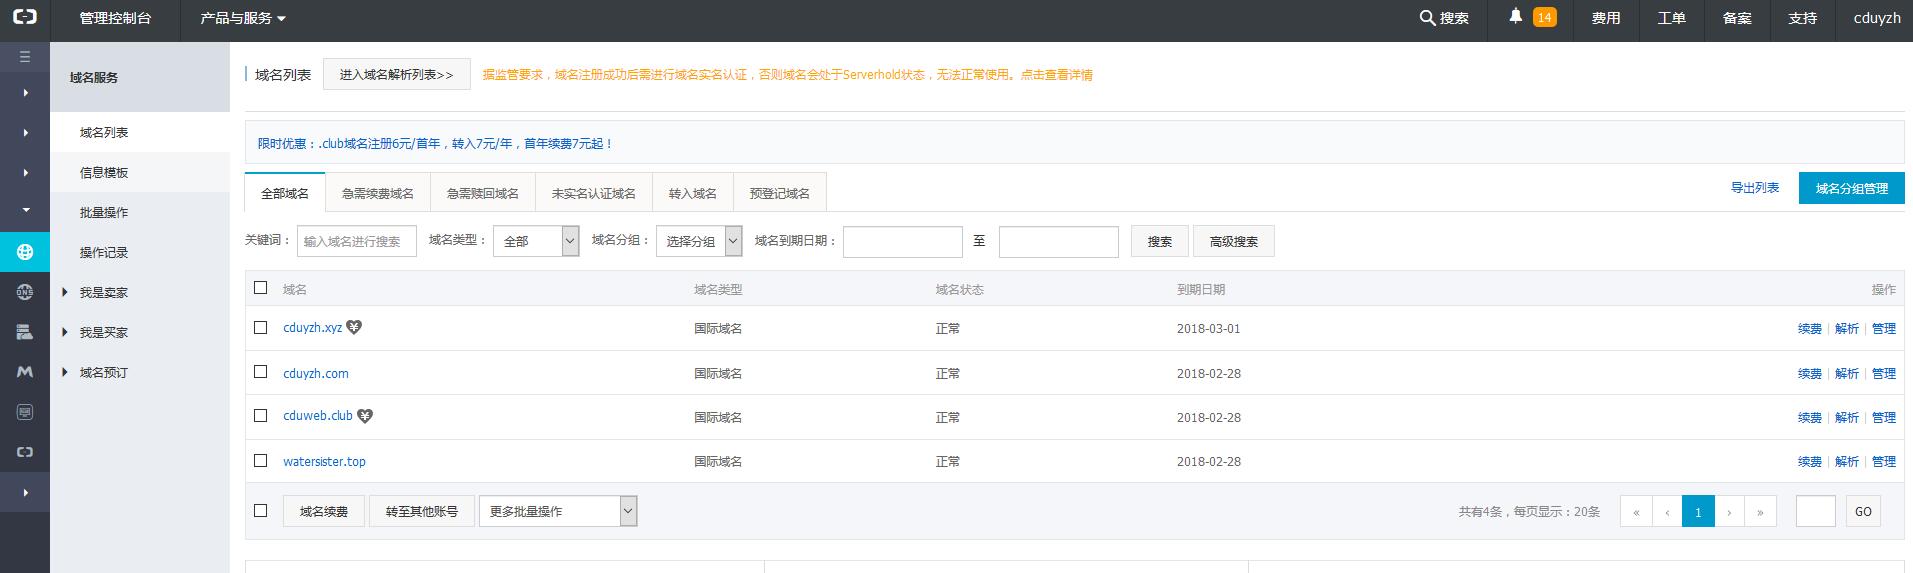 进入到控制台后点击自己刚买的域名进入域名管理界面,
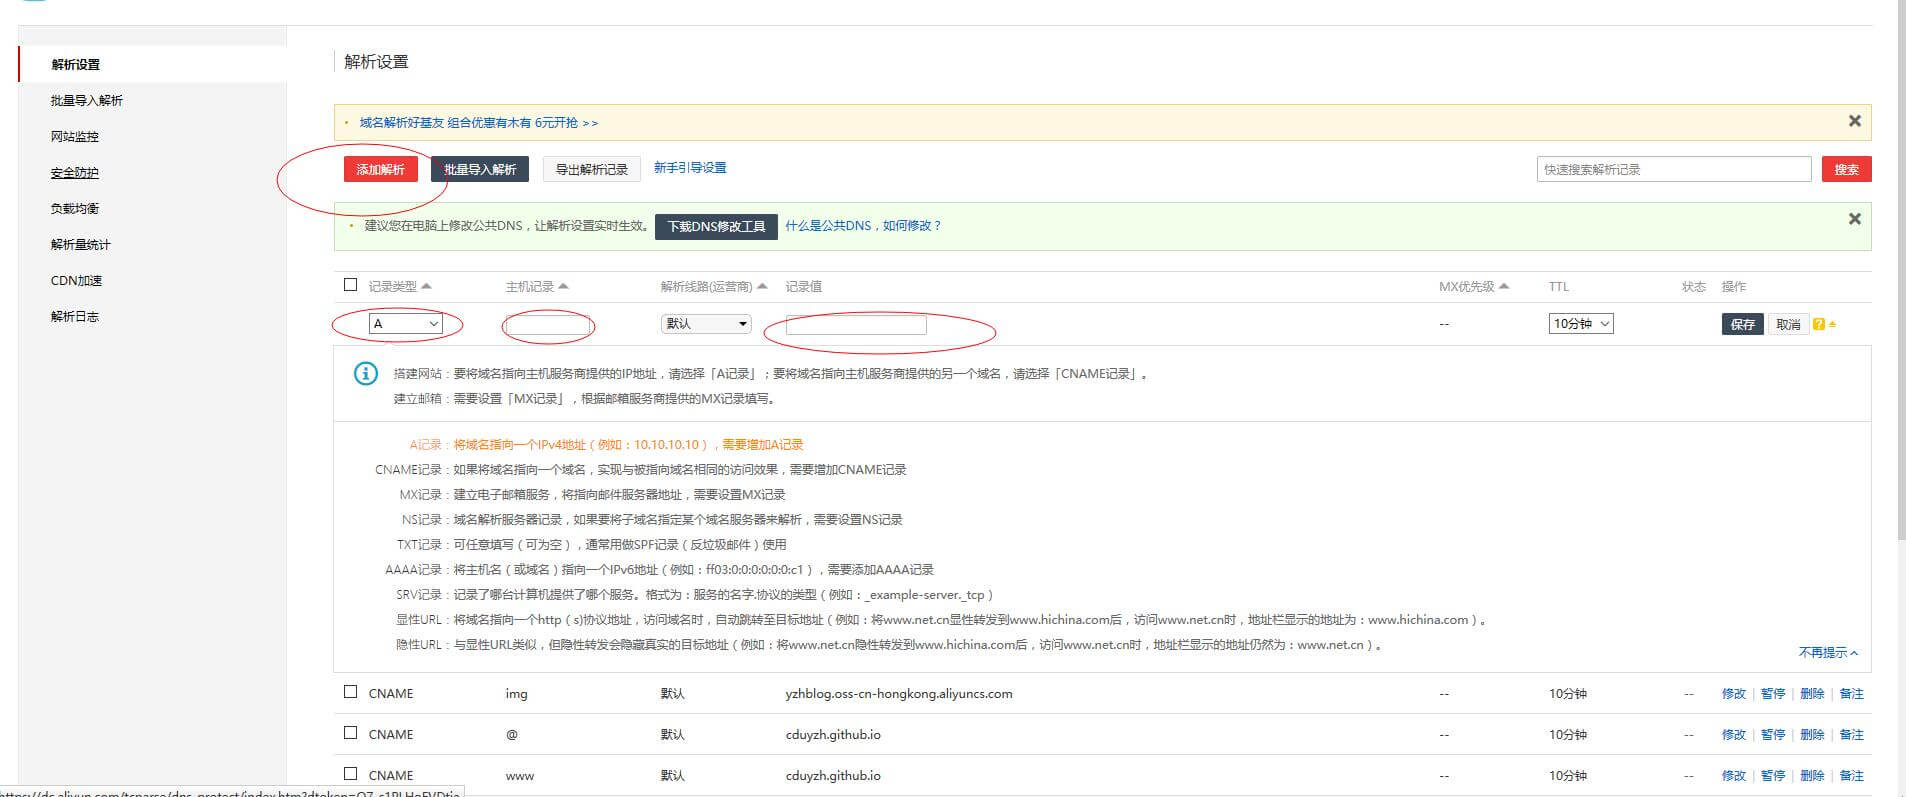 然后进行添加解析操作,按照途中所给的值填写,注意将记录值改为自己的github pages地址
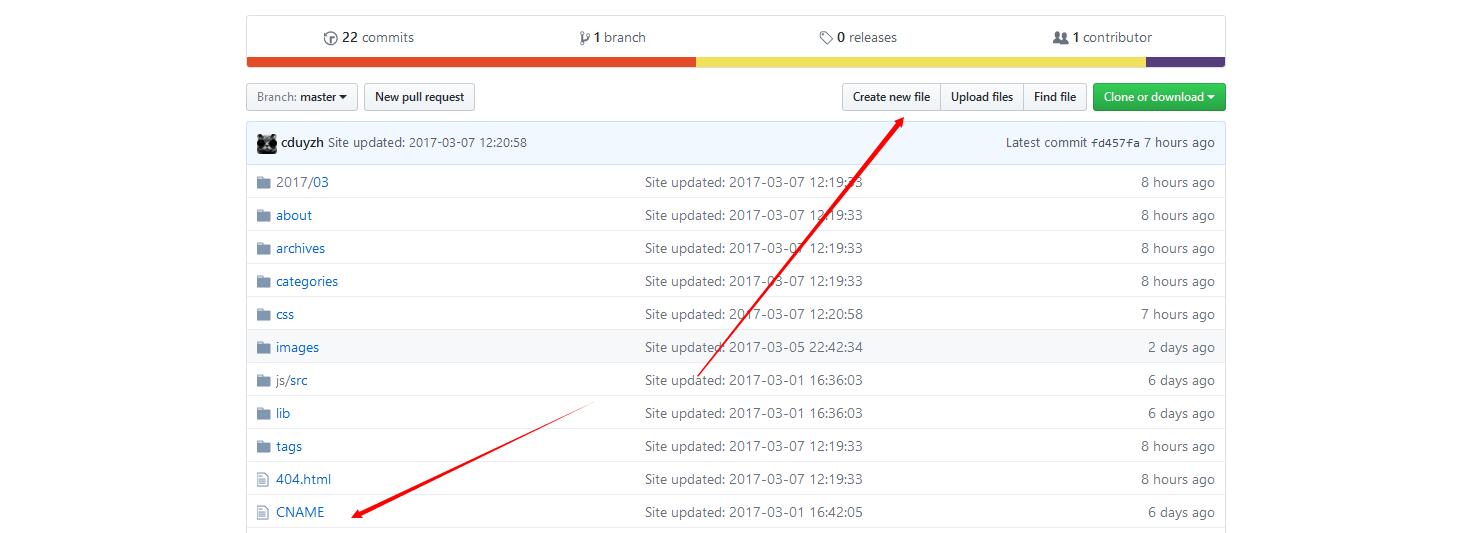 最后一步必须在所建立的github仓库的主分支里建立一个CNAME文件内容为你要解析到的目地地址
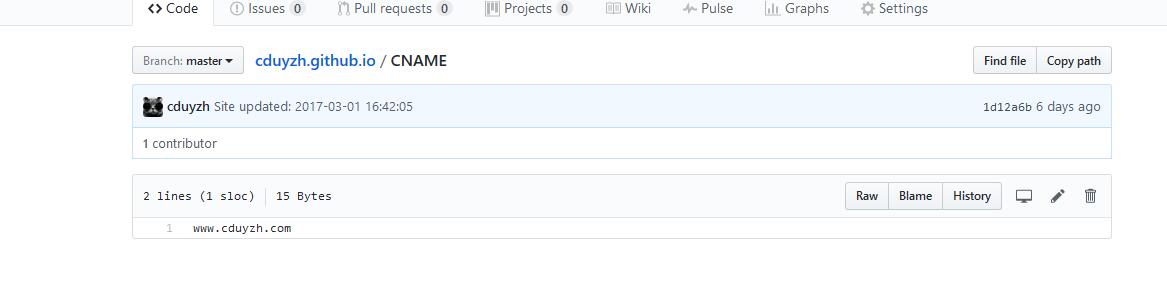 注意
这个CNAME文件要放到source文件里面我的路径为
注意
这个CNAME文件要放到source文件里面我的路径为
D:\hexo\blog\source\放到这个下面的用意为你每次hexo d的时候会把你原先仓库的所有东西清除掉,所以你的CNAME文件也会没有,这样可以避免这种情况发生
hexo安装和配置
Hexo博客搭建的基础大致流程为: 安装Node.js →安装Git → 安装Hexo → 安装主题 → 本地测试运行 → 注册给github与coding并创建pages仓库 → 部署 Node.js和git的安装大家自己去网上搜下,当以上都安好后可以通过git bash来输入命令查看是否安装成功以及对应的版本

随后执行下述命令来安装hexo
npm install -g hexo-clihexo初始化
安装完成后要先提前建好一个文件夹,所以我在自己D盘建立了一个hexo文件夹,里面随后剪了一个blog文件夹,用命令cd到blog这个目录
cd d:/hexo/blog执行命令
hexo init  # hexo会在目标文件夹建立网站所需要的所有文件
npm install  # 安装依赖包
本地启动
有了必要的各种配置文件之后就可以在本地预览效果了
 hexo g # 等同于hexo generate,生成静态文件到public文件夹
 hexo s # 等同于hexo server,在本地服务器运行
还有个命令
hexo clean #作用为清除静态文件夹的内容并删掉,主要用于更改变更了某些地方导致页面显示不完善之后打开浏览器并输入IP地址 http://localhost:4000/ 查看,效果如下

新建页面和文章
hexo new "title"  # 生成新文章:\source\_posts\title.md
hexo new page "title"  # 生成新的页面,后面可在主题配置文件中配置页面
生成文章或页面的模板放在博客文件夹根目录下的 scaffolds/ 文件夹里面,文章对应的是 post.md ,页面对应的是page.md,草稿的是draft.md
编辑文章
打开新建的文章\source_posts\postName.md,其中postName是hexo new "title"中的title
---
title: Start My Blog Trip — Power By Hexo  # 文章页面上的显示名称,可以任意修改,不会出现在URL中
date: 2017-2-10 23:49:28  # 文章生成时间,一般不改
categories: diary  # 文章分类目录,多个分类使用[a,b,c]这种格式
tags: [Hexo,diary]  # 文章标签
---
#这里开始使用markdown格式输入你的正文。
<!--more-->
#more标签以下的内容要点击“阅读全文”才能看见,#more标签以上的内容为你首页显示文章的摘要部分
MD文章编辑
如果你对MD语法不熟悉,推荐你去马克飞象使用它的在线网页编辑,可以实现一边打字一边查看效果,很方便。 地址:https://maxiang.io/
常用命令总结
hexo init [folder] # 初始化一个网站。如果没有设置 folder ,Hexo 默认在目前的文件夹建立网站
hexo new [layout] <title> # 新建一篇文章。如果没有设置 layout 的话,默认使用 _config.yml 中的 default_layout 参数代替。如果标题包含空格的话,请使用引号括起来
hexo version # 查看版本
hexo clean # 清除缓存文件 (db.json) 和已生成的静态文件 (public)
hexo g # 等于hexo generate # 生成静态文件
hexo s # 等于hexo server # 本地预览
hexo d # 等于hexo deploy # 部署,可与hexo g合并为 hexo d -g
安装主题
前言
截止2017年,hexo和next都在更新,现今网上的版本和其对应的配置文件都已经发生了巨大的变化,所以我把官网最新的17年的版本配置文件的详情给大家来讲解,大家可以下最新的版本和看我的配置进行修改。
主题下载
hexo主题有很多,这里我自己使用的next主题所以就以它来讲。我的版本为v5.1.0(目前最新)
下载地址:
https://github.com/iissnan/hexo-theme-next/releases
把下来的文件夹解压和更名为next,并复制到theme目录下
HEXO网站的配置文件
在根目录下的_config.yml主要是对网站的总属性进行设置
如:网站标题,网站logo,网站插件使用等全局的属性
主题目录下的_config.yml主要是针对网站的布局,导航等特性设置进行设置
我的根目录配置文件
## Hexo Configuration
## Docs: https://hexo.io/docs/configuration.html
## Source: https://github.com/hexojs/hexo/


## Site
title: Water Sister's Blog
subtitle: 生活、技术个人博客
description: 思考中.....
author: Yang ZiHao
language: zh-Hans
timezone:


## URL
## If your site is put in a subdirectory, set url as 'http://yoursite.com/child' and root as '/child/'
url: http://www.cduyzh.com
root: /
permalink: :title/
permalink_defaults:


## Directory
source_dir: source
public_dir: public
tag_dir: tags
archive_dir: archives
category_dir: categories
code_dir: downloads/code
i18n_dir: :lang
skip_render:
 - baidu_verify_n9RJHacKra.html
 - google5caece7c800b9ce3.html
## Writing
new_post_name: :title.md # File name of new posts
default_layout: post
titlecase: false # Transform title into titlecase
external_link: true # Open external links in new tab
filename_case: 0
render_drafts: false
post_asset_folder: true
relative_link: false
future: true
highlight:
  enable: true
  line_number: true
  auto_detect: false
  tab_replace:


## Category & Tag
default_category: uncategorized
category_map:
tag_map:


## Date / Time format
## Hexo uses Moment.js to parse and display date
## You can customize the date format as defined in
## http://momentjs.com/docs/#/displaying/format/
date_format: YYYY-MM-DD
time_format: HH:mm:ss


## Pagination
## Set per_page to 0 to disable pagination
per_page: 10
pagination_dir: page


## Extensions
Plugins:
  - hexo-generator-sitemap
  - hexo-generator-baidu-sitemap


## Plugins: https://hexo.io/plugins/
## Themes: https://hexo.io/themes/
theme: next


## Deployment
## Docs: https://hexo.io/docs/deployment.html
deploy:
  type: git
  repo:
    github: git@github.com:cduyzh/cduyzh.github.io.git,master
index_generator:
  per_page: 5


archive_generator:
  per_page: 20
  yearly: true
  monthly: true


tag_generator:
  per_page: 10


menu:
  about: /about


#头像设置
avatar: /images/yzh.jpg


## 多说热评文章 true 或者 false
duoshuo_hotartical: true


#sitemap
## hexo sitemap
sitemap:
  path: sitemap.xml
baidusitemap:
  path: baidusitemap.xml


#local search
search:
  path: search.xml
  field: post
  format: html
  limit: 1000
我的主题目录配置文件
## ---------------------------------------------------------------
## Site Information Settings
## ---------------------------------------------------------------


## Put your favicon.ico into `hexo-site/source/` directory.
favicon: /images/favicon.ico


## Set default keywords (Use a comma to separate)
keywords: "cduyzh前端开发博客"


## Set rss to false to disable feed link.
## Leave rss as empty to use site's feed link.
## Set rss to specific value if you have burned your feed already.
rss:


## Specify the date when the site was setup
#since: 2015


## icon between year and author @Footer
authoricon: tint


## Footer `powered-by` and `theme-info` copyright
copyright: false


## Canonical, set a canonical link tag in your hexo, you could use it for your SEO of blog.
## See: https://support.google.com/webmasters/answer/139066
## Tips: Before you open this tag, remember set up your URL in hexo _config.yml ( ex. url: http://yourdomain.com )
canonical: true


## Change headers hierarchy on site-subtitle (will be main site description) and on all post/pages titles for better SEO-optimization.
seo: true


## ---------------------------------------------------------------
## Menu Settings
## ---------------------------------------------------------------


## When running the site in a subdirectory (e.g. domain.tld/blog), remove the leading slash (/archives -> archives)
menu:
  home: /
  categories: /categories
  about: /about
  archives: /archives
  tags: /tags
  #commonweal: /404.html
  #sitemap: /sitemap.xml
  life: /categories/life
  technology: //categories/technology


## Enable/Disable menu icons.
## Icon Mapping:
##   Map a menu item to a specific FontAwesome icon name.
##   Key is the name of menu item and value is the name of FontAwesome icon. Key is case-senstive.
##   When an question mask icon presenting up means that the item has no mapping icon.
menu_icons:
  enable: true
  #KeyMapsToMenuItemKey: NameOfTheIconFromFontAwesome
  home: home
  about: user
  categories: th
  schedule: calendar
  tags: tags
  archives: archive
  sitemap: sitemap
  commonweal: heart
  life: coffee
  technology: cog


## ---------------------------------------------------------------
## Scheme Settings
## ---------------------------------------------------------------


## Schemes
#scheme: Muse
scheme: Mist
#scheme: Pisces


## ---------------------------------------------------------------
## Font Settings
## - Find fonts on Google Fonts (https://www.google.com/fonts)
## - All fonts set here will have the following styles:
##     light, light italic, normal, normal italic, bold, bold italic
## - Be aware that setting too much fonts will cause site running slowly
## - Introduce in 5.0.1
## ---------------------------------------------------------------
font:
  enable: true


  # Uri of fonts host. E.g. //fonts.googleapis.com (Default)
  host:


  # Global font settings used on <body> element.
  global:
    # external: true will load this font family from host.
    external: true
    family: Lato


  # Font settings for Headlines (h1, h2, h3, h4, h5, h6)
  # Fallback to `global` font settings.
  headings:
    external: true
    family:


  # Font settings for posts
  # Fallback to `global` font settings.
  posts:
    external: true
    family:


  # Font settings for Logo
  # Fallback to `global` font settings.
  # The `size` option use `px` as unit
  logo:
    external: true
    family:
    size:


  # Font settings for <code> and code blocks.
  codes:
    external: true
    family:
    size:


## ---------------------------------------------------------------
## Sidebar Settings
## ---------------------------------------------------------------


## Social Links
## Key is the link label showing to end users.
## Value is the target link (E.g. GitHub: https://github.com/iissnan)
social:
  #LinkLabel: Link
   GitHub: https://github.com/cduyzh
   知乎: https://www.zhihu.com/people/yang-zi-hao-cheng-du-da-xue
   Weibo: http://weibo.com/3290722423/
   QQ: http://wpa.qq.com/msgrd?v=3&uin=450311265&site=qq&menu=yes


## Social Links Icons
## Icon Mapping:
##   Map a menu item to a specific FontAwesome icon name.
##   Key is the name of the item and value is the name of FontAwesome icon. Key is case-senstive.
##   When an globe mask icon presenting up means that the item has no mapping icon.
social_icons:
  enable: true
  # Icon Mappings.
  # KeyMapsToSocialItemKey: NameOfTheIconFromFontAwesome
  GitHub: github
  #Twitter: twitter
  Weibo: weibo
  QQ: qq


## Sidebar Avatar
## in theme directory(source/images): /images/avatar.jpg
## in site  directory(source/uploads): /uploads/avatar.jpg
#avatar:


## Table Of Contents in the Sidebar
toc:
  enable: true


  # Automatically add list number to toc.
  number: true


## Creative Commons 4.0 International License.
## http://creativecommons.org/
## Available: by | by-nc | by-nc-nd | by-nc-sa | by-nd | by-sa | zero
#creative_commons: by-nc-sa
#creative_commons:


sidebar:
  # Sidebar Position, available value: left | right
  position: left
  #position: right


  # Sidebar Display, available value:
  #  - post    expand on posts automatically. Default.
  #  - always  expand for all pages automatically
  #  - hide    expand only when click on the sidebar toggle icon.
  #  - remove  Totally remove sidebar including sidebar toggle.
  #display: post
  display: always
  #display: hide
  #display: remove


  # Sidebar offset from top menubar in pixels.
  offset: 12
  offset_float: 0


  # Back to top in sidebar
  b2t: false


  # Scroll percent label in b2t button
  scrollpercent: false


## Blog rolls
links_title: Links
#links_layout: block
#links_layout: inline
links:
  hexo: https://hexo.io/zh-cn/
  next: http://theme-next.iissnan.com/
  web project: http://www.watersister.top


## ---------------------------------------------------------------
## Post Settings
## ---------------------------------------------------------------


## Automatically scroll page to section which is under <!-- more --> mark.
scroll_to_more: true


## Automatically excerpt description in homepage as preamble text.
excerpt_description: true


## Automatically Excerpt. Not recommend.
## Please use <!-- more --> in the post to control excerpt accurately.
auto_excerpt:
  enable: true
  length: 400


## Post meta display settings
post_meta:
  item_text: true
  created_at: true
  updated_at: false
  categories: true


## Post wordcount display settings
## Dependencies: https://github.com/willin/hexo-wordcount
post_wordcount:
  item_text: true
  wordcount: true
  min2read: true


#Wechat Subscriber
#wechat_subscriber:
## enabled: true
## qcode:  /images/wechatpay.jpg
## description: subscribe to my blog by scanning my public wechat account


## ---------------------------------------------------------------
## Misc Theme Settings
## ---------------------------------------------------------------


## Custom Logo.
## !!Only available for Default Scheme currently.
## Options:
##   enabled: [true/false] - Replace with specific image
##   image: url-of-image   - Images's url
custom_logo:
  enabled: false
  image:


## Code Highlight theme
## Available value:
##    normal | night | night eighties | night blue | night bright
## https://github.com/chriskempson/tomorrow-theme
highlight_theme: night


## ---------------------------------------------------------------
## Third Party Services Settings
## ---------------------------------------------------------------


## MathJax Support
mathjax:
  enable: false
  per_page: false
  cdn: //cdn.mathjax.org/mathjax/latest/MathJax.js?config=TeX-AMS-MML_HTMLorMML


## Swiftype Search API Key
#swiftype_key:


## Baidu Analytics ID
#baidu_analytics:


## Duoshuo ShortName
duoshuo_shortname: cduyzh


## Disqus
#disqus_shortname:


## Hypercomments
#hypercomments_id:


## Gentie productKey
#gentie_productKey:


## Support for youyan comments system.
## You can get your uid from http://www.uyan.cc
#youyan_uid: your uid


## Support for LiveRe comments system.
## You can get your uid from https://livere.com/insight/myCode (General web site)
#livere_uid: your uid


## Baidu Share
## Available value:
##    button | slide
## Warning: Baidu Share does not support https.
#baidushare:
##  type: button


## Share
#jiathis:
## Warning: JiaThis does not support https.
#add_this_id:


## Share
duoshuo_share: true


## Google Webmaster tools verification setting
## See: https://www.google.com/webmasters/
#google_site_verification:


## Google Analytics
#google_analytics:


## Yandex Webmaster tools verification setting
## See: https://webmaster.yandex.ru/
#yandex_site_verification:


## CNZZ count
#cnzz_siteid:


## Application Insights
## See https://azure.microsoft.com/en-us/services/application-insights/
## application_insights:


## Make duoshuo show UA
## user_id must NOT be null when admin_enable is true!
## you can visit http://dev.duoshuo.com get duoshuo user id.
duoshuo_info:
  ua_enable: true
  admin_enable: false
  user_id: 6224774254659896065
  admin_nickname: author


## Facebook SDK Support.
## https://github.com/iissnan/hexo-theme-next/pull/410
facebook_sdk:
  enable: false
  app_id:       #<app_id>
  fb_admin:     #<user_id>
  like_button:  #true
  webmaster:    #true


## Facebook comments plugin
## This plugin depends on Facebook SDK.
## If facebook_sdk.enable is false, Facebook comments plugin is unavailable.
facebook_comments_plugin:
  enable: false
  num_of_posts: 10  # min posts num is 1
  width: 100%       # default width is 550px
  scheme: light     # default scheme is light (light or dark)


## VKontakte API Support.
## To get your AppID visit https://vk.com/editapp?act=create
vkontakte_api:
  enable: false
  app_id:       #<app_id>
  like:         true
  comments:     true
  num_of_posts: 10


## Show number of visitors to each article.
## You can visit https://leancloud.cn get AppID and AppKey.
leancloud_visitors:
  enable: true
  app_id: TxBSdzFliqxOpec29xEd8pO5-gzGzoHsz
  app_key: 5rH911Nhs9V7AWFjEYqe8Bz7


## Show PV/UV of the website/page with busuanzi.
## Get more information on http://ibruce.info/2015/04/04/busuanzi/
busuanzi_count:
  # count values only if the other configs are false
  enable: true
  # custom uv span for the whole site
  site_uv: true
  site_uv_header: <i class="fa fa-user"></i> 访问用户:
  site_uv_footer: 人
  # custom pv span for the whole site
  site_pv: true
  site_pv_header: <i class="fa fa-eye"></i> 访问次数:
  site_pv_footer: 次
  # custom pv span for one page only
  page_pv: false
  page_pv_header: <i class="fa fa-file-o"></i> 点击量
  page_pv_footer: 次


## Tencent analytics ID
## tencent_analytics:


## Tencent MTA ID
## tencent_mta:


## Enable baidu push so that the blog will push the url to baidu automatically which is very helpful for SEO
baidu_push: true


## Google Calendar
## Share your recent schedule to others via calendar page
## ## API Documentation:
## https://developers.google.com/google-apps/calendar/v3/reference/events/list
calendar:
  enable: false
  calendar_id: <required>
  api_key: <required>
  orderBy: startTime
  offsetMax: 24
  offsetMin: 4
  timeZone:
  showDeleted: false
  singleEvents: true
  maxResults: 250


## Algolia Search
algolia_search:
  enable: false
  hits:
    per_page: 10
  labels:
    input_placeholder: Search for Posts
    hits_empty: "We didn't find any results for the search: ${query}"
    hits_stats: "${hits} results found in ${time} ms"


## Local search
local_search:
  enable: true


## External URL with BASE64 encrypt & decrypt
## Usage: {% exturl text url "title" %}
## Alias: {% extlink text url "title" %}
exturl: false


#! ---------------------------------------------------------------
#! DO NOT EDIT THE FOLLOWING SETTINGS
#! UNLESS YOU KNOW WHAT YOU ARE DOING
#! ---------------------------------------------------------------


## Motion
use_motion: true


## Fancybox
fancybox: true


## Canvas-nest
canvas_nest: true


## Script Vendors.
## Set a CDN address for the vendor you want to customize.
## For example
##    jquery: https://ajax.googleapis.com/ajax/libs/jquery/2.2.0/jquery.min.js
## Be aware that you should use the same version as internal ones to avoid potential problems.
## Please use the https protocol of CDN files when you enable https on your site.
vendors:
  # Internal path prefix. Please do not edit it.
  _internal: lib


  # Internal version: 2.1.3
  jquery: //cdn.bootcss.com/jquery/2.1.3/jquery.min.js


  # Internal version: 2.1.5
  # Fancybox: http://fancyapps.com/fancybox/
  fancybox: //cdn.bootcss.com/fancybox/2.1.5/jquery.fancybox.pack.js
  fancybox_css: //cdn.bootcss.com/fancybox/2.1.5/jquery.fancybox.min.css


  # Internal version: 1.0.6
  fastclick: //cdn.bootcss.com/fastclick/1.0.6/fastclick.min.js


  # Internal version: 1.9.7
  # See: https://github.com/tuupola/jquery_lazyload
  lazyload: //cdn.bootcss.com/jquery_lazyload/1.9.7/jquery.lazyload.min.js


  # Internal version: 1.2.1
  velocity:


  # Internal version: 1.2.1
  velocity_ui:


  # Internal version: 0.7.9
  # See: https://faisalman.github.io/ua-parser-js/
  ua_parser:


  # Internal version: 4.6.2
  # See: http://fontawesome.io/
  fontawesome: //cdn.bootcss.com/font-awesome/4.7.0/css/font-awesome.min.css


  # Internal version: 1
  # https://www.algolia.com
  algolia_instant_js:
  algolia_instant_css:


  # Internal version: 1.0.0
  # https://github.com/hustcc/canvas-nest.js
  canvas_nest: //cdn.bootcss.com/canvas-nest.js/1.0.1/canvas-nest.min.js


## Assets
css: css
js: js
images: images


## Theme version
version: 5.1.0


## 多说热评文章 true 或者 false
duoshuo_hotartical: true


reward_comment: 坚持原创技术分享,您的支持将鼓励我继续创作!
wechatpay: /images/wechatpay.jpg
alipay: /images/alipay.jpgPS:可以不用一次性看完,理解下各个属性即可,官网也没有对所有配置的中文解释,只有一些例子配置对应的参数而已。
相信绝大数人都没看完,大家可以后面自己配置的时候再来看。
启用主题
打开站点配置文件, 找到 theme 字段,并将其值更改为 next
theme: next注意:后有个空格必须要有空格哦 然后 hexo s 即可在localshost:4000地址里预览主题效果
更换主题外观
next有三个主题样式
## Schemes
#scheme: Muse
scheme: Mist
#scheme: Pisces
我用的是第二个
更换语言为中文,在根目录配置文件下配置language: zh-Hans
## Site
title: Water Sister's Blog
subtitle: 生活、技术个人博客
description: 思考中.....
author: Yang ZiHao
language: zh-Hans
timezone:
添加网站小图标
在主题目录配置文件下设置
## Put your favicon.ico into `hexo-site/source/` directory.
favicon: /images/favicon.ico
大部分的设定都能在NexT的官方文档 里面找到,如侧栏、头像、打赏、评论、订阅、连接、分享、数据统计等等,在此就不多讲了,照着文档走就行了,接下只是个性定制的问题。 所以给个官方文档大家可以自己去看一遍: http://theme-next.iissnan.com/theme-settings.html
部署发行项目
前言
假设前面已经注册了github帐号和创建了对应的仓库,通过配置SSH来建立连接。
生成SSH
$ ssh-keygen -t rsa -C "邮件地址@youremail.com"
Generating public/private rsa key pair.
Enter file in which to save the key (/Users/your_user_directory/.ssh/id_rsa):<回车>
系统会要求你输入密码,这里设置的密码主要是在你提交Git时弹出密码认证,不想输入直接回车
Enter passphrase (empty for no passphrase):<输入加密串>
Enter same passphrase again:<再次输入加密串>
成功后如图:

配置SSH
找到id_rsa.pub 并复制文件内容
id_rsa.pub文件一般位于电脑用户配置文件夹下的一个.ssh文件下C:\Users\你的用户名.ssh
登录Github并添加密钥
进入github首页在右上角选择settings设置。
 创建一个新的SSH key,图中显示我已经创建好了。
title可以随便取
创建一个新的SSH key,图中显示我已经创建好了。
title可以随便取

测试通过git bash链接到Git
链接Git
$ ssh -T git@github.com提示如下:yes
The authenticity of host 'github.com (207.65.227.44)' can't be established.
RSA key fingerprint is 16:27:42:18:60:1d:7b:13:d2:b5:c4:20:7e:56:86:d8:71:f3
Are you sure you want to continue connecting (yes/no)?
以下为成功链接到Git
Hi XXXX! You've successfully authenticated, but GitHub does not provide shell access.使用Git bash简单的设置一下用户信息:
git config --global user.name your name
git config --global user.email your_email@youremail.com
部署到Github
在此之前,先安装Git部署插件
npm install hexo-deployer-git --save打开根目录配置文件,拉到底部,修改部署配置:
deploy:
  type: git
  repo:
    github: git@github.com:cduyzh/cduyzh.github.io.git,master
注意冒号后面是网站对应的用户名,接着就是/,然后再是你的项目名加上 .git,master
保存后终端执行
hexo clean
hexo g
hexo d
结果如下为成功上传

总结
到这里基本上完成了hexo的配置和项目的上传,后面我会讲一些文章的编辑,分类,标签的运用,还会对next主题进行一些分析,如果想自己设置主题和样式建议先把next主题的官方中文文档看一下,我会对其中的一些进行解释。