
第07章-CSS3动画特效
第07章-前端核心技术-CSS3动画特效
项目经理(作者):张明星
学习目标
- 掌握CSS3特效的制作
重点 - 掌握CSS3各种转换的特效
重点 - 掌握CSS3动画的制作
重点 - 掌握CSS3渐变色的使用
- 掌握CSS3响应式设计
难点
CSS3 过渡transition
过渡属性
| 属性 | 描述 |
|---|---|
| transition | 简写属性,用于在一个属性中设置四个过渡属性。 |
| transition-property | 规定应用过渡的 CSS 属性的名称。 |
| transition-duration | 定义过渡效果花费的时间。默认是 0。 |
| transition-timing-function | 规定过渡效果的时间曲线。默认是 "ease"。 |
| transition-delay | 规定过渡效果何时开始。默认是 0。 |
案例01
<!DOCTYPE html>
<html>
    <head>
        <meta charset="utf-8">
        <title>变换</title>
        <style>
            div {
                width: 100px;
                background: blue;
                -webkit-transition: width 2s linear 1s,
                background-color 2s linear 1s;


                transition: width 2s linear 1s,
                background-color 2s linear 1s;
            }
            div:hover {
                width: 200px;
                background-color: red;
            }
            img {
                width: 100%;
            }
        </style>
    </head>
    <body>
        <p><b>注意:</b>无法在 IE9 及更早 IE 版本上工作。</p>
        <div><img src="image/avatar.jpg" /></div>
    </body>
</html>
效果图

CSS3 转换transform
转换属性
| Property | 描述 |
|---|---|
| transform | 适用于2D或3D转换的元素 |
2D 转换
| 函数 | 描述 |
|---|---|
| matrix(n,n,n,n,n,n) | 2D 转换,使用六个值的矩阵。(选修) |
| translate(x,y) | 2D 转换,沿着 X 和 Y 轴移动元素。 |
| translateX(n) | 2D 转换,沿着 X 轴移动元素。 |
| translateY(n) | 2D 转换,沿着 Y 轴移动元素。 |
| scaleX(n) | 2D 缩放转换,改变元素的宽度。 |
| scaleY(n) | 2D 缩放转换,改变元素的高度。 |
| rotate(angle) | 2D 旋转,在参数中规定角度。 |
| skew(x-angle,y-angle) | 2D 倾斜转换,沿着 X 和 Y 轴。 |
| skewX(angle) | 2D 倾斜转换,沿着 X 轴。 |
| skewY(angle) | 2D 倾斜转换,沿着 Y 轴。 |
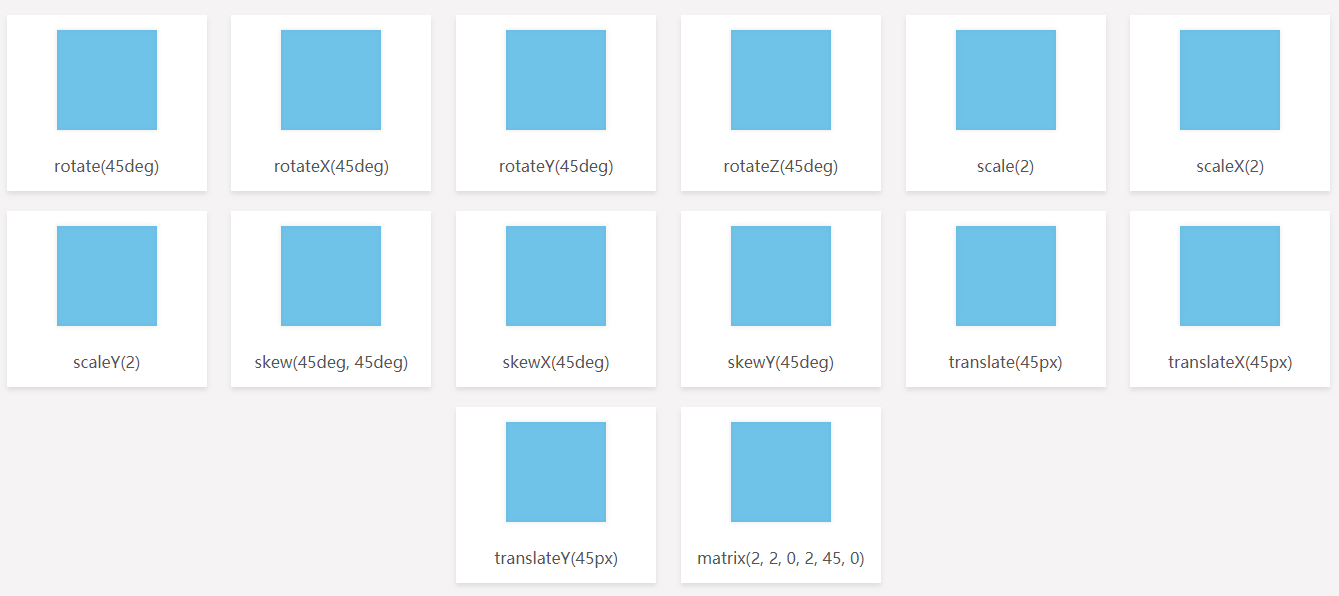
translate(?px/%) 位置变换
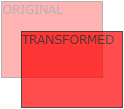
translate()方法,根据左(X轴)和顶部(Y轴)位置给定的参数,从当前元素位置移动。
rotate(?deg) 旋转
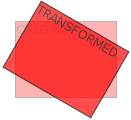
rotate()方法,在一个给定度数顺时针旋转的元素。负值是允许的,这样是元素逆时针旋转。
scale(x,y) 尺寸改变
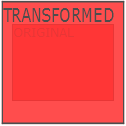
scale()方法,该元素增加或减少的大小,取决于宽度(X轴)和高度(Y轴)的参数:
skew(?deg,?deg) 倾斜
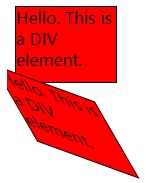
transform:skew(angle [,angle]);
包含两个参数值,分别表示X轴和Y轴倾斜的角度,如果第二个参数为空,则默认为0,参数为负表示向相反方向倾斜。
- skewX(angle);表示只在X轴(水平方向)倾斜。
- skewY(angle);表示只在Y轴(垂直方向)倾斜。
3D转换
CSS3 transform-style 属性
| 值 | 描述 |
|---|---|
| flat | 表示所有子元素在2D平面呈现。 |
| preserve-3d | 表示所有子元素在3D空间中呈现。 |
3D 转换方法
| 函数 | 描述 |
|---|---|
| matrix3d(n,n,n,n,n,n, n,n,n,n,n,n,n,n,n,n) | 3D 转换,使用 16 个值的 4x4 矩阵。 |
| translate3d(x,y,z) | 3D 转化。 |
| translateX(x) | 3D 转化,仅使用用于 X 轴的值。 |
| translateY(y) | 3D 转化,仅使用用于 Y 轴的值。 |
| translateZ(z) | 3D 转化,仅使用用于 Z 轴的值。 |
| scale3d(x,y,z) | 3D 缩放转换。 |
| scaleX(x) | 3D 缩放转换,通过给定一个 X 轴的值。 |
| scaleY(y) | 3D 缩放转换,通过给定一个 Y 轴的值。 |
| scaleZ(z) | 3D 缩放转换,通过给定一个 Z 轴的值。 |
| rotate3d(x,y,z,angle) | 3D 旋转。 |
| rotateX(angle) | 定义沿 X 轴的 3D 旋转。 |
| rotateY(angle) | 定义沿 Y 轴的 3D 旋转。 |
| rotateZ(angle) | 定义沿 Z 轴的 3D 旋转。 |
| perspective(n) | 3D 转换元素的透视视图。 |
transform-origin
transform-origin属性用于设置3D变换的中心位置
transform-origin: x-axis y-axis z-axis;
| 值 | 描述 |
|---|---|
| x-axis | 定义视图被置于 X 轴的何处。可能的值:leftcenterrightlength% |
| y-axis | 定义视图被置于 Y 轴的何处。可能的值:topcenterbottomlength% |
| z-axis | 定义视图被置于 Z 轴的何处。可能的值:length |
案例02
<!DOCTYPE html>
<html>


    <head>
        <meta charset="UTF-8">
        <title></title>
        <link rel="stylesheet" type="text/css" href="css/index.css"/>
    </head>


    <body>
        <h1>Css3 Transform</h1>
        <!-- Rotate-->
        <div class="card">
            <div class="box rotate">
                <div class="fill"></div>
            </div>
            <p>rotate(45deg) </p>
        </div>
        <div class="card">
            <div class="box rotateX">
                <div class="fill"></div>
            </div>
            <p>rotateX(45deg)</p>
        </div>
        <div class="card">
            <div class="box rotateY">
                <div class="fill"></div>
            </div>
            <p>rotateY(45deg)</p>
        </div>
        <div class="card">
            <div class="box rotateZ">
                <div class="fill"></div>
            </div>
            <p>rotateZ(45deg) </p>
        </div>
        <!-- scale-->
        <div class="card">
            <div class="box scale">
                <div class="fill"></div>
            </div>
            <p>scale(2)</p>
        </div>
        <div class="card">
            <div class="box scaleX">
                <div class="fill"></div>
            </div>
            <p>scaleX(2) </p>
        </div>
        <div class="card">
            <div class="box scaleY">
                <div class="fill"></div>
            </div>
            <p>scaleY(2) </p>
        </div>
        <!-- skew-->
        <div class="card">
            <div class="box skew">
                <div class="fill"></div>
            </div>
            <p>skew(45deg, 45deg) </p>
        </div>
        <div class="card">
            <div class="box skewX">
                <div class="fill"></div>
            </div>
            <p>skewX(45deg)</p>
        </div>
        <div class="card">
            <div class="box skewY">
                <div class="fill"></div>
            </div>
            <p>skewY(45deg)</p>
        </div>
        <!-- translate-->
        <div class="card">
            <div class="box translate">
                <div class="fill"></div>
            </div>
            <p>translate(45px) </p>
        </div>
        <div class="card">
            <div class="box translateX">
                <div class="fill"></div>
            </div>
            <p>translateX(45px)</p>
        </div>
        <div class="card">
            <div class="box translateY">
                <div class="fill"></div>
            </div>
            <p>translateY(45px)</p>
        </div>
        <div class="card">
            <div class="box matrix">
                <div class="fill"></div>
            </div>
            <p> matrix(2, 2, 0, 2, 45, 0)</p>
        </div>
        <h4>Perspective : 100</h4>
        <div class="perspective-100">
            <div class="card">
                <div class="box rotateX">
                    <div class="fill"></div>
                </div>
                <p>rotateX(90deg)</p>
            </div>
            <div class="card">
                <div class="box rotateY">
                    <div class="fill"></div>
                </div>
                <p>rotateY(45deg)</p>
            </div>
        </div>
        <h4>Perspective : 200</h4>
        <div class="perspective-200">
            <div class="card">
                <div class="box rotateX">
                    <div class="fill"></div>
                </div>
                <p>rotateX(90deg)</p>
            </div>
            <div class="card">
                <div class="box rotateY">
                    <div class="fill"></div>
                </div>
                <p>rotateY(45deg)</p>
            </div>
        </div>
        <!-- transform origin-->
        <h2>Transform origin</h2>
        <div class="card">
            <div class="box rotate">
                <div class="fill to-100-0-0"></div>
            </div>
            <p>transform-origin : 100% 0 0 <br/>rotate(45deg)</p>
        </div>
        <div class="card">
            <div class="box rotate">
                <div class="fill to-0-100-0"></div>
            </div>
            <p>transform-origin : 0 100% 0<br/>rotate(45deg)</p>
        </div>
        <div class="card perspective-200">
            <div class="box rotateX">
                <div class="fill to-0-100-0"></div>
            </div>
            <p>transform-origin : 0 100% 0<br/>rotateX(45deg)</p>
        </div>
        <div class="card perspective-200">
            <div class="box rotateX">
                <div class="fill to-100-0-0"></div>
            </div>
            <p>transform-origin : 0 100% 0<br/>rotateX(45deg)</p>
        </div>
        <div class="card perspective-200">
            <div class="box rotateY">
                <div class="fill to-0-100-0"></div>
            </div>
            <p>transform-origin : 0 100% 0 <br/>rotateY(45deg)</p>
        </div>
        <div class="card perspective-200">
            <div class="box rotateY">
                <div class="fill to-100-0-0"></div>
            </div>
            <p>transform-origin : 100% 0 0<br/>rotateY(45deg)</p>
        </div>
        <div class="card">
            <div class="box scale">
                <div class="fill to-100-0-0"></div>
            </div>
            <p>transform-origin : 100% 0 0<br/>scale(2)</p>
        </div>
        <div class="card">
            <div class="box scale">
                <div class="fill to-0-100-0"></div>
            </div>
            <p>transform-origin : 0 100% 0<br/>scale(2)</p>
        </div>
        <div class="card">
            <div class="box scaleX">
                <div class="fill to-100-0-0"></div>
            </div>
            <p>transform-origin : 100% 0 0<br/>scaleX(2)</p>
        </div>
        <div class="card">
            <div class="box scaleX">
                <div class="fill to-0-100-0"></div>
            </div>
            <p>transform-origin : 0 100% 0<br/>scaleX(2)</p>
        </div>
        <div class="card">
            <div class="box scaleY">
                <div class="fill to-100-0-0"></div>
            </div>
            <p>transform-origin : 100% 0 0<br/>scaleY(2)</p>
        </div>
        <div class="card">
            <div class="box scaleY">
                <div class="fill to-0-100-0"></div>
            </div>
            <p>transform-origin : 0 100% 0<br/>scaleY(2)</p>
        </div>
    </body>


</html>
效果图
CSS3 动画
@keyframes规则是创建动画。 @keyframes规则内指定一个CSS样式和动画将逐步从目前的样式更改为新的样式。
当在 @keyframes 创建动画,把它绑定到一个选择器,否则动画不会有任何效果。
CSS3的动画属性
| 属性 | 描述 | CSS |
|---|---|---|
| @keyframes | 规定动画。 | 3 |
| animation | 所有动画属性的简写属性,除了 animation-play-state 属性。 | 3 |
| animation-name | 规定 @keyframes 动画的名称。 | 3 |
| animation-duration | 规定动画完成一个周期所花费的秒或毫秒。默认是 0。 | 3 |
| animation-timing-function | 规定动画的速度曲线。默认是 "ease"。 | 3 |
| animation-delay | 规定动画何时开始。默认是 0。 | 3 |
| animation-iteration-count | 规定动画被播放的次数。默认是 1。Infinite:无限循环 | 3 |
| animation-direction | 规定动画是否在下一周期逆向地播放。默认是 "normal"。 | 3 |
| animation-play-state | 规定动画是否正在运行或暂停。默认是 "running"、“paused”。 | 3 |
animation-timing-function
指定动画将如何完成一个周期。速度曲线定义动画从一套 CSS 样式变为另一套所用的时间。速度曲线用于使变化更为平滑。
| 值 | 描述 |
|---|---|
| linear | 动画从头到尾的速度是相同的。 |
| ease | 默认。动画以低速开始,然后加快,在结束前变慢。 |
| ease-in | 动画以低速开始。 |
| ease-out | 动画以低速结束。 |
| ease-in-out | 动画以低速开始和结束。 |
| step-start | 只显示动画第一帧 |
| step-end | 只显示动画最后一帧 |
| cubic-bezier(n,n,n,n) | 在 cubic-bezier 函数中自己的值。可能的值是从 0 到 1 的数值。 |
#div1 {animation-timing-function:cubic-bezier(0,0,0.25,1);}
#div2 {animation-timing-function:cubic-bezier(0.25,0.1,0.25,1);}
#div3 {animation-timing-function:cubic-bezier(0.42,0,1,1);}
#div4 {animation-timing-function:cubic-bezier(0,0,0.58,1);}
#div5 {animation-timing-function:cubic-bezier(0.42,0,0.58,1);}


#div1 {-webkit-animation-timing-function:cubic-bezier(0,0,0.25,1);}
#div2 {-webkit-animation-timing-function:cubic-bezier(0.25,0.1,0.25,1);}
#div3 {-webkit-animation-timing-function:cubic-bezier(0.42,0,1,1);}
#div4 {-webkit-animation-timing-function:cubic-bezier(0,0,0.58,1);}
#div5 {-webkit-animation-timing-function:cubic-bezier(0.42,0,0.58,1);}
animation-fill-mode
| 值 | 描述 |
|---|---|
| none | 默认值。动画在动画执行之前和之后不会应用任何样式到目标元素。 |
| forwards | 在动画结束后(由 animation-iteration-count 决定),动画将应用该属性值。 |
| backwards | 动画将应用在 animation-delay 定义期间启动动画的第一次迭代的关键帧中定义的属性值。这些都是 from 关键帧中的值(当 animation-direction 为 "normal" 或 "alternate" 时)或 to 关键帧中的值(当 animation-direction 为 "reverse" 或 "alternate-reverse" 时)。 |
| both | 动画遵循 forwards 和 backwards 的规则。也就是说,动画会在两个方向上扩展动画属性。 |
animation-direction 属性
| 值 | 描述 |
|---|---|
| normal | 默认值。动画按正常播放。 |
| reverse | 动画反向播放。 |
| alternate | 动画在奇数次(1、3、5...)正向播放,在偶数次(2、4、6...)反向播放。 |
| alternate-reverse | 动画在奇数次(1、3、5...)反向播放,在偶数次(2、4、6...)正向播放。 |
animation-play-state 属性
| 值 | 描述 |
|---|---|
| paused | 指定暂停动画 |
| running | 指定正在运行的动画 |
案例03
<!DOCTYPE html>
<html>
    <head>
        <meta charset="utf-8">
        <title>动画</title>
        <style>
            div {
                width: 100px;
                height: 100px;
                background: red;
                position: relative;
                animation: myfirst 5s;
                -webkit-animation: myfirst 5s;
                animation-iteration-count: infinite;
            }
            @keyframes myfirst {
                0% {
                    background: red;
                    left: 0px;
                    top: 0px;
                }
                25% {
                    background: yellow;
                    left: 200px;
                    top: 0px;
                }
                50% {
                    background: blue;
                    left: 200px;
                    top: 200px;
                }
                75% {
                    background: green;
                    left: 0px;
                    top: 200px;
                }
                100% {
                    background: red;
                    left: 0px;
                    top: 0px;
                }
            }
            @-webkit-keyframes myfirst
            /* Safari and Chrome */
            {
                0% {
                    background: red;
                    left: 0px;
                    top: 0px;
                }
                25% {
                    background: yellow;
                    left: 200px;
                    top: 0px;
                }
                50% {
                    background: blue;
                    left: 200px;
                    top: 200px;
                }
                75% {
                    background: green;
                    left: 0px;
                    top: 200px;
                }
                100% {
                    background: red;
                    left: 0px;
                    top: 0px;
                }
            }
        </style>
    </head>
    <body>
        <p><b>注意:</b> 该实例在 Internet Explorer 9 及更早 IE 版本是无效的。</p>
        <div></div>
    </body>
</html>
效果展示

案例04
<!DOCTYPE html>
<html>
    <head>
        <meta charset="utf-8">
        <title></title>
        <style>
            div {
                width: 100px;
                height: 100px;
                background: red;
                position: relative;
                animation-name: myfirst;
                animation-duration: 5s;
                animation-timing-function: linear;
                animation-delay: 2s;
                animation-iteration-count: infinite;
                animation-direction: alternate;
                animation-play-state: running;
                -webkit-animation-name: myfirst;
                -webkit-animation-duration: 5s;
                -webkit-animation-timing-function: linear;
                -webkit-animation-delay: 2s;
                -webkit-animation-iteration-count: infinite;
                -webkit-animation-direction: alternate;
                -webkit-animation-play-state: running;
            }
            @keyframes myfirst {
                0% {background: red;left: 0px;top: 0px;}
                25% {background: yellow;left: 200px;top: 0px;}
                50% {background: blue;left: 200px;top: 200px;}
                75% {background: green;left: 0px;top: 200px;}
                100% {background: red;left: 0px;top: 0px;}
            }
            @-webkit-keyframes myfirst{
                0% {background: red;left: 0px;top: 0px;}
                25% {background: yellow;left: 200px;top: 0px;}
                50% {background: blue;left: 200px;top: 200px;}
                75% {background: green;left: 0px;top: 200px;}
                100% {background: red;left: 0px;top: 0px;}
            }
        </style>
    </head>
    <body>
        <p>注意:该实例在 Internet Explorer 9 及更早 IE 版本是无效的。</p>
        <div></div>
    </body>
</html>
效果展示

CSS3 渐变(Gradients)
以前,你必须使用图像来实现这些效果。但是,通过使用 CSS3 渐变(gradients),你可以减少下载的事件和宽带的使用。此外,渐变效果的元素在放大时看起来效果更好,因为渐变(gradient)是由浏览器生成的。
CSS3 定义了两种类型的渐变(gradients):
- 线性渐变(Linear Gradients)- 向下/向上/向左/向右/对角方向
- 径向渐变(Radial Gradients)- 由它们的中心定义
线性渐变
为了创建一个线性渐变,你必须至少定义两种颜色结点。颜色结点即你想要呈现平稳过渡的颜色。同时,你也可以设置一个起点和一个方向(或一个角度)。
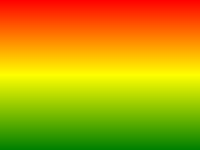
语法
background: linear-gradient(direction direction, color stop1, color stop2, ...);线性渐变 - 从上到下(默认情况下)
案例05
<!DOCTYPE html>
<html>
    <head>
        <meta charset="utf-8">
        <title>渐变</title>
        <style>
            #grad1 {
                height: 200px;
                background: -webkit-linear-gradient(left top,red 20%, blue 80%);
                background: -o-linear-gradient(left top,red 20%, blue 80%);
                background: -moz-linear-gradient(left top,red 20%, blue 80%);
                background: linear-gradient(left top,red 20%, blue 80%);
                /* 标准的语法(必须放在最后) */
            }
        </style>
    </head>
    <body>
        <h3>线性渐变 - 从上到下</h3>
        <p>从顶部开始的线性渐变。起点是红色,慢慢过渡到蓝色:</p>
        <div id="grad1"></div>
    </body>
</html>
效果图

使用角度
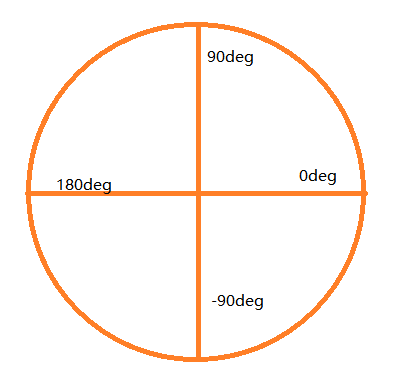
如果你想要在渐变的方向上做更多的控制,你可以定义一个角度,而不用预定义方向(to bottom、to top、to right、to left、to bottom right,等等)。
background: linear-gradient(angle, color stop1, color stop2);角度是指水平线和渐变线之间的角度,逆时针方向计算。
#grad {
    background: -webkit-linear-gradient(180deg, red 30px, blue 120px);
    background: -o-linear-gradient(180deg, red 30px, blue 120px);
    background: -moz-linear-gradient(180deg, red 30px, blue 120px);
    background: linear-gradient(180deg, red 30px, blue 120px);
}
重复的线性渐变
repeating-linear-gradient() 函数用于重复线性渐变:
#grad {
    background: -webkit-repeating-linear-gradient(red, yellow 10%, green 20%);
    background: -o-repeating-linear-gradient(red, yellow 10%, green 20%);
    background: -moz-repeating-linear-gradient(red, yellow 10%, green 20%);
    background: repeating-linear-gradient(red, yellow 10%, green 20%);
}

径向渐变
为了创建一个径向渐变,你也必须至少定义两种颜色结点。颜色结点即你想要呈现平稳过渡的颜色。同时,你也可以指定渐变的中心、形状(圆形或椭圆形)、大小。默认情况下,渐变的中心是 center(表示在中心点),渐变的形状是 ellipse(表示椭圆形),渐变的大小是 farthest-corner(表示到最远的角落)。
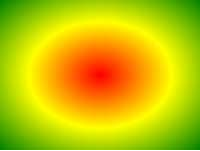
语法
background: radial-gradient(position position, shape size, startColor size, ..., lastColor size);径向渐变 - 颜色结点均匀分布(默认情况下)
设置形状
shape 参数定义了形状。它可以是值 circle 或 ellipse。其中,circle 表示圆形,ellipse 表示椭圆形。默认值是 ellipse。
size 参数定义了渐变的大小。它可以是以下四个值:
- closest-side - 靠近最近的边
- farthest-side - 靠近最远的边
- closest-corner - 靠近最近的角
- farthest-corner - 靠近最远的角
#grad1 {
    background: -webkit-radial-gradient(60% 55%, closest-side,blue,green,yellow,black);
    background: -o-radial-gradient(60% 55%, closest-side,blue,green,yellow,black);
    background: -moz-radial-gradient(60% 55%, closest-side,blue,green,yellow,black);
    background: radial-gradient(60% 55%, closest-side,blue,green,yellow,black);
}
重复的径向渐变
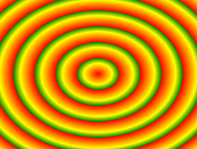
repeating-radial-gradient() 函数用于重复径向渐变:
#grad {
    background: -webkit-repeating-radial-gradient(red, yellow 10%, green 15%);
    background: -o-repeating-radial-gradient(red, yellow 10%, green 15%);
    background: -moz-repeating-radial-gradient(red, yellow 10%, green 15%);
    background: repeating-radial-gradient(red, yellow 10%, green 15%);
}
CSS3 媒体查询
CSS3 的多媒体查询继承了 CSS2 多媒体类型的所有思想: 取代了查找设备的类型,CSS3 根据设置自适应显示。
媒体查询可用于检测很多事情,例如:
- viewport(视窗) 的宽度与高度
- 设备的宽度与高度
- 朝向 (智能手机横屏,竖屏)
- 分辨率
目前很多针对苹果手机,Android 手机,平板等设备都会使用到多媒体查询。
@media not|only mediatype and (expressions) { CSS 代码...; }CSS3 多媒体类型
| 值 | 描述 |
|---|---|
| all | 用于所有多媒体类型设备 |
| 用于打印机 | |
| screen | 用于电脑屏幕,平板,智能手机等。 |
| speech | 用于屏幕阅读器CSS3 多媒体类型 |
CSS3 多媒体参数类型
| 值 | 描述 |
|---|---|
| not | not是用来排除掉某些特定的设备的,比如 @media not print(非打印设备) |
| only | 用来定某种特别的媒体类型。对于支持Media Queries的移动设备来说,如果存在only关键字,移动设备的Web浏览器会忽略only关键字并直接根据后面的表达式应用样式文件。对于不支持Media Queries的设备但能够读取Media Type类型的Web浏览器,遇到only关键字时会忽略这个样式文件。 |
| all | 所有设备,这个应该经常看到。 |
也可以在不同的媒体上使用不同的样式文件:
<link rel="stylesheet" media="mediatype and|not|only (expressions)" href="print.css">常用尺寸
常用于图片流
@media all and (max-width: 1690px) { ... }
@media all and (max-width: 1280px) { ... }
@media all and (max-width: 980px) { ... }
@media all and (max-width: 736px) { ... }
@media all and (max-width: 480px) { ... }
常用于稍微复杂的基本响应
@media all and (min-width:1200px){ ... }
@media all and (min-width: 960px) and (max-width: 1199px) { ... }
@media all and (min-width: 768px) and (max-width: 959px) { ... }
@media all and (min-width: 480px) and (max-width: 767px){ ... }
@media all and (max-width: 599px) { ... }
@media all and (max-width: 479px) { ... }
基于Bootstrap 3.x 全球主流框架
@media all and (max-width: 991px) { ... }
@media all and (max-width: 768px) { ... }
@media all and (max-width: 480px) { ... }
基于Bootstrap 4.x 全球主流框架
@media (min-width: 576px) { ... }
@media (min-width: 768px) { ... }
@media (min-width: 992px) { ... }
@media (min-width: 1200px) { ... }
移动端页面制作字号大小设定问题,设计稿文字字号规范,解决移动端大小屏适配问题
逻辑分辨率:320*480  《==》 物理分辨率:640*690       最小字号:12px
逻辑分辨率:320*658  《==》 物理分辨率:640*1136      最小字号:12px
逻辑分辨率:375*667  《==》 物理分辨率:750*1334      最小字号:14px(13.5px)
逻辑分辨率:414*736  《==》 物理分辨率:1242*2208(1080*1920) 最小字号:15px


前端按照逻辑分辨率设字号大小《==》rem进行适配移动端大小屏幕;
@media screen and (min-width: 480px) {
body {
background-color: lightgreen;
}
}在屏幕可视窗口尺寸大于 480 像素的设备上修改背景颜色
案例06
<!DOCTYPE html>
<html>
    <head>
        <meta charset="utf-8">
        <title>媒体查询</title>
        <style>
            ul {
                list-style-type: none;
            }
            ul li a {
                color: green;
                text-decoration: none;
                padding: 3px;
                display: block;
            }
            @media screen and (min-width: 240px) and (max-width: 320px),(min-width: 700px) {
                ul li a {
                    padding-left: 30px;
                    color: blue;
                    background: url(image/email-icon.png) left center no-repeat;
                }
            }
            @media screen and (min-width: 320px) and (max-width: 480px) {
                ul li a {
                    color: red;
                }
                ul li a:before {
                    content: "邮箱:";
                    font-style: italic;
                    color: #666666;
                }
            }
            @media screen and (min-width: 480px) and (max-width: 640px) {
                ul li a:before {
                    content: "邮箱:";
                    font-style: italic;
                    color: lightcoral;
                }
                ul li a:after {
                    content: " (" attr(data-email) ")";
                    font-size: 12px;
                    font-style: italic;
                    color: #666666;
                }
            }
            @media screen and (min-width: 640px) {
                ul li a:before {
                    content: "邮箱:";
                    font-style: italic;
                    color: lightcoral;
                    padding-left: 30px;
                    background: url(image/email-icon.png) left center no-repeat;
                }
                ul li a:after {
                    content: " (" attr(data-email) ")";
                    font-size: 12px;
                    font-style: italic;
                    color: #666666;
                }
            }
        </style>
    </head>
    <body>
        <ul>
            <li><a data-email="johndoe@qq.com" href="mailto:johndoe@qq.com">张三</a></li>
            <li><a data-email="marymoe@qq.com" href="mailto:marymoe@qq.com">李四</a></li>
            <li><a data-email="amandapanda@qq.com" href="mailto:amandapanda@qq.com">王五</a></li>
        </ul>
    </body>
</html>
效果图

Animate.css插件
Animate.css是某位大牛写好的动画效果集合,需要的时候可以直接下载导入到项目中,在需要的元素上添加相关的类即可使用相对应的动画效果。
下载后引入到html文件中即可使用。
使用:
<div id="test" class="animated infinite bounce ">bounce</div>- animated:表示使用Animate.css的动画
- infinite:表示动画效果无限循环
- bounce:是动画效果
动画效果有很多,下面的案例就展示了各种动画效果
案例07
<!DOCTYPE html>
<html>


    <head>
        <meta charset="UTF-8">
        <title></title>
        <link rel="stylesheet" type="text/css" href="css/animate.min.css" />
        <style type="text/css">
            #content{
                padding-top: 20%;
            }
            #test {
                width: 50%;
                line-height: 100px;
                margin: auto;
                background-color: rgba(10, 10, 10, 0.2);
                text-align: center;
            }
            select{
                display: block;
                height: 45px;
                margin: auto;
            }
        </style>
        <script type="text/javascript">
            window.onload = function(){
                document.getElementById('select').onchange = function(){
                    val = this.options[this.selectedIndex].value;
                    document.getElementById('test').setAttribute('class','animated infinite '+val);
                }
            }
        </script>
    </head>


    <body>
        <div id="content">
            <div id="test">bounce</div>
        </div>
        <select id="select">
            <optgroup label="Attention Seekers">
                <option value="bounce">bounce</option>
                <option value="flash">flash</option>
                <option value="pulse">pulse</option>
                <option value="rubberBand">rubberBand</option>
                <option value="shake">shake</option>
                <option value="swing">swing</option>
                <option value="tada">tada</option>
                <option value="wobble">wobble</option>
                <option value="jello">jello</option>
            </optgroup>


            <optgroup label="Bouncing Entrances">
                <option value="bounceIn">bounceIn</option>
                <option value="bounceInDown">bounceInDown</option>
                <option value="bounceInLeft">bounceInLeft</option>
                <option value="bounceInRight">bounceInRight</option>
                <option value="bounceInUp">bounceInUp</option>
            </optgroup>


            <optgroup label="Bouncing Exits">
                <option value="bounceOut">bounceOut</option>
                <option value="bounceOutDown">bounceOutDown</option>
                <option value="bounceOutLeft">bounceOutLeft</option>
                <option value="bounceOutRight">bounceOutRight</option>
                <option value="bounceOutUp">bounceOutUp</option>
            </optgroup>


            <optgroup label="Fading Entrances">
                <option value="fadeIn">fadeIn</option>
                <option value="fadeInDown">fadeInDown</option>
                <option value="fadeInDownBig">fadeInDownBig</option>
                <option value="fadeInLeft">fadeInLeft</option>
                <option value="fadeInLeftBig">fadeInLeftBig</option>
                <option value="fadeInRight">fadeInRight</option>
                <option value="fadeInRightBig">fadeInRightBig</option>
                <option value="fadeInUp">fadeInUp</option>
                <option value="fadeInUpBig">fadeInUpBig</option>
            </optgroup>


            <optgroup label="Fading Exits">
                <option value="fadeOut">fadeOut</option>
                <option value="fadeOutDown">fadeOutDown</option>
                <option value="fadeOutDownBig">fadeOutDownBig</option>
                <option value="fadeOutLeft">fadeOutLeft</option>
                <option value="fadeOutLeftBig">fadeOutLeftBig</option>
                <option value="fadeOutRight">fadeOutRight</option>
                <option value="fadeOutRightBig">fadeOutRightBig</option>
                <option value="fadeOutUp">fadeOutUp</option>
                <option value="fadeOutUpBig">fadeOutUpBig</option>
            </optgroup>


            <optgroup label="Flippers">
                <option value="flip">flip</option>
                <option value="flipInX">flipInX</option>
                <option value="flipInY">flipInY</option>
                <option value="flipOutX">flipOutX</option>
                <option value="flipOutY">flipOutY</option>
            </optgroup>


            <optgroup label="Lightspeed">
                <option value="lightSpeedIn">lightSpeedIn</option>
                <option value="lightSpeedOut">lightSpeedOut</option>
            </optgroup>


            <optgroup label="Rotating Entrances">
                <option value="rotateIn">rotateIn</option>
                <option value="rotateInDownLeft">rotateInDownLeft</option>
                <option value="rotateInDownRight">rotateInDownRight</option>
                <option value="rotateInUpLeft">rotateInUpLeft</option>
                <option value="rotateInUpRight">rotateInUpRight</option>
            </optgroup>


            <optgroup label="Rotating Exits">
                <option value="rotateOut">rotateOut</option>
                <option value="rotateOutDownLeft">rotateOutDownLeft</option>
                <option value="rotateOutDownRight">rotateOutDownRight</option>
                <option value="rotateOutUpLeft">rotateOutUpLeft</option>
                <option value="rotateOutUpRight">rotateOutUpRight</option>
            </optgroup>


            <optgroup label="Sliding Entrances">
                <option value="slideInUp">slideInUp</option>
                <option value="slideInDown">slideInDown</option>
                <option value="slideInLeft">slideInLeft</option>
                <option value="slideInRight">slideInRight</option>
            </optgroup>


            <optgroup label="Sliding Exits">
                <option value="slideOutUp">slideOutUp</option>
                <option value="slideOutDown">slideOutDown</option>
                <option value="slideOutLeft">slideOutLeft</option>
                <option value="slideOutRight">slideOutRight</option>
            </optgroup>


            <optgroup label="Zoom Entrances">
                <option value="zoomIn">zoomIn</option>
                <option value="zoomInDown">zoomInDown</option>
                <option value="zoomInLeft">zoomInLeft</option>
                <option value="zoomInRight">zoomInRight</option>
                <option value="zoomInUp">zoomInUp</option>
            </optgroup>


            <optgroup label="Zoom Exits">
                <option value="zoomOut">zoomOut</option>
                <option value="zoomOutDown">zoomOutDown</option>
                <option value="zoomOutLeft">zoomOutLeft</option>
                <option value="zoomOutRight">zoomOutRight</option>
                <option value="zoomOutUp">zoomOutUp</option>
            </optgroup>


            <optgroup label="Specials">
                <option value="hinge">hinge</option>
                <option value="jackInTheBox">jackInTheBox</option>
                <option value="rollIn">rollIn</option>
                <option value="rollOut">rollOut</option>
            </optgroup>
        </select>
    </body>


</html>
效果展示

Wow.js插件
Wow.js是javascript动画插件,经常配合animate.css一起使用。动画效果会在元素第一次出现在页面中时起作用。
下载地址:https://www.delac.io/WOW/
Wow.js的使用方法
- 引入wow.js
- 在需要使用的元素上添加
class=”wow” - 使用js初始化
案例08
<!DOCTYPE html>
<html>


    <head>
        <meta charset="UTF-8">
        <title></title>
        <link rel="stylesheet" type="text/css" href="css/animate.min.css" />
        <script src="js/wow.min.js" type="text/javascript" charset="utf-8"></script>
        <style type="text/css">
            #content {
                padding-top: 20%;
            }


            #test {
                width: 50%;
                line-height: 100px;
                margin: auto;
                background-color: rgba(10, 10, 10, 0.2);
                text-align: center;
            }
        </style>
        <script type="text/javascript">
            var wow = new WOW({
                boxClass: 'wow', // 动画使用的class
                animateClass: 'animated infinite', // 附加的class
                offset: 0, // 当元素进入页面多少位置的时候开始动画,默认0
                mobile: true, // 是否在移动设备上显示动画效果,默认true
                live: true, // 是否异步加载内容,默认true
                callback: function(box) {},
                scrollContainer: null
            });
            wow.init();
        </script>
    </head>


    <body>
        <div id="content">
            <div id="test" class="wow bounce">bounce</div>
        </div>
    </body>


</html>
