Tauri 预先准备
安装
首先您需要安装 Rust 及其他系统依赖。 请记住,只有在开发 Tauri 应用时才需要此设置。 您程序的用户不需要进行下列操作。
Windows
1. Microsoft Visual Studio C++ 生成工具
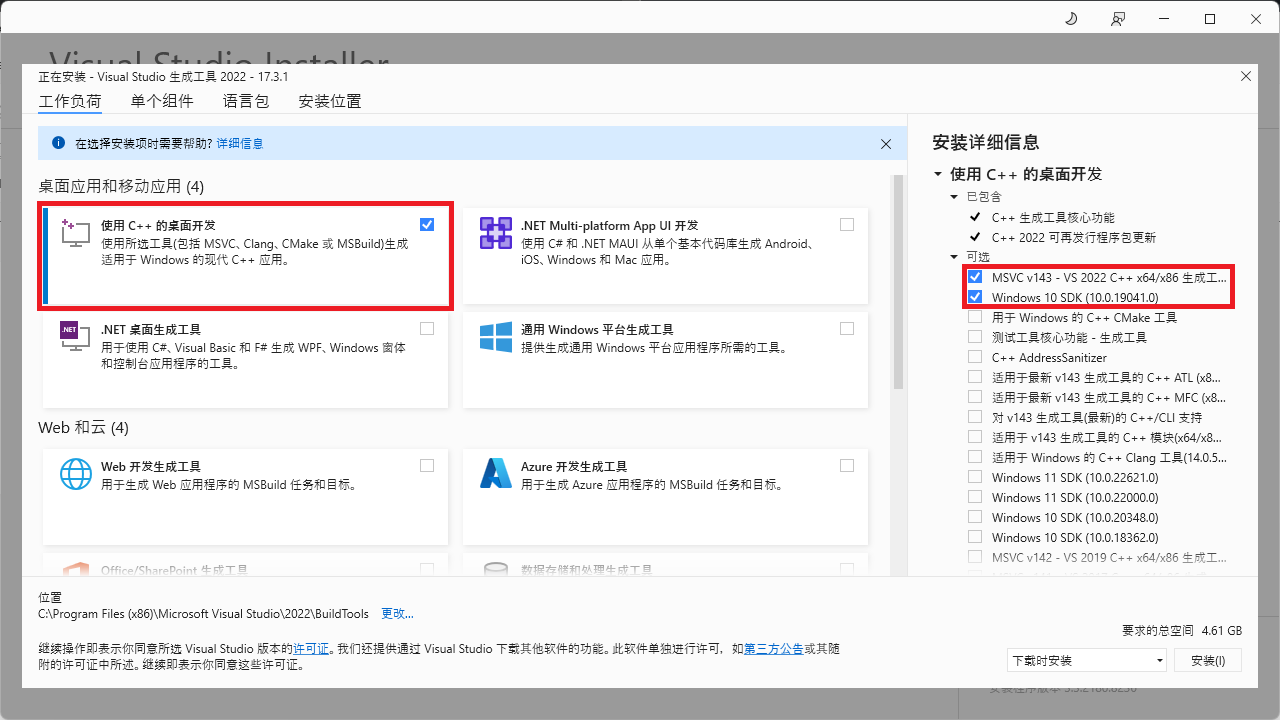
您需要安装 Microsoft C++ 生成工具。 最简单的方法是下载 Visual Studio 2022 生成工具。 进行安装选择时,请勾选 "C++ 生成工具" 和 Windows 10 SDK。

2. WebView2
备注On Windows 10 (Version 1803 and later with all updates applied) and Windows 11, the WebView2 runtime is distributed as part of the operating system.
Tauri 需要 WebView2 才能在 Windows 上呈现网页内容,所以您必须先安装 WebView2。 最简单的方法是从微软网站下载和运行常青版引导程序。
安装脚本会自动为您下载适合您架构的版本。 不过,如果您遇到问题 (特别是 Windows on ARM),您可以自己手动选择正确版本。
3. Rust
最后,请前往 https://www.rust-lang.org/zh-CN/tools/install 来安装 rustup (Rust 安装程序)。 请注意,为了使更改生效,您必须重新启动终端,在某些情况下需要重新启动 Windows 本身。
或者,您可以在 PowerShell 中使用 winget 命令安装程序:
winget install --id Rustlang.RustupMSVC TOOLCHAIN AS DEFAULT
For full support for Tauri and tools like trunk make sure the MSVC Rust toolchain is the selected default host triple in the installer dialog. Depending on your system it should be either x86_64-pc-windows-msvc, i686-pc-windows-msvc, or aarch64-pc-windows-msvc.
If you already have Rust installed, you can make sure the correct toolchain is installed by running this commandrustup default stable-msvc
macOS
1. CLang 和 macOS 开发依赖项
您将需要安装 CLang 和 macOS 开发依赖项。 为此,您需要在终端中执行以下命令:
xcode-select --install2. Rust
要在 macOS 上安装 Rust,请打开终端并输入以下命令:
curl --proto '=https' --tlsv1.2 https://sh.rustup.rs -sSf | sh备注
我们已审计了此 Bash 脚本,它只做了该做的事情。 但是,您最好在复制粘贴运行脚本之前,看看其源代码。 这是它的源代码:rustup.sh
此命令将下载以上脚本并开始安装用来安装最新版 Rust 的 rustup 工具。 您可能需要输入密码。 若安装成功,终端将显示以下内容:
Rust is installed now. Great!请确保重新启动终端以使更改生效。
Linux
1. 系统依赖
您需要安装几个系统依赖,如 C 语言编译器和 webkit2gtk。 下方是适用于部分热门发行版的安装命令:
- Debian
sudo apt update
sudo apt install libwebkit2gtk-4.0-dev \
    build-essential \
    curl \
    wget \
    libssl-dev \
    libgtk-3-dev \
    libayatana-appindicator3-dev \
librsvg2-dev- Arch
sudo pacman -Syu
sudo pacman -S --needed \
    webkit2gtk \
    base-devel \
    curl \
    wget \
    openssl \
    appmenu-gtk-module \
    gtk3 \
    libappindicator-gtk3 \
    librsvg \
    libvips
- Fedora
sudo dnf check-update
sudo dnf install webkit2gtk4.0-devel \
    openssl-devel \
    curl \
    wget \
    libappindicator-gtk3 \
    librsvg2-devel
sudo dnf group install "C Development Tools and Libraries"- Gentoo
sudo emerge --ask \
    net-libs/webkit-gtk:4 \
    dev-libs/libappindicator \
    net-misc/curl \
net-misc/wget- openSUSE
sudo zypper up
sudo zypper in webkit2gtk3-soup2-devel \
    libopenssl-devel \
    curl \
    wget \
    libappindicator3-1 \
    librsvg-devel
sudo zypper in -t pattern devel_basis- NixOS
Working on NixOS requires a slightly different setup, as Tauri needs to find the required system libraries both at compile time and dynamically at runtime. 为了 Tauri 正常运作,环境变量 LD_LIBRARY_PATH 必须用正确的路径填充。
When using [Nix Flakes], copy the following code into flake.nix on your repository, then run nix develop to activate the development environment. You can also use [direnv's Flakes integration] to automatically start the dev shell when entering the project folder.
{
  inputs = {
    nixpkgs.url = "nixpkgs";
    flake-utils.url = "github:numtide/flake-utils";
  };

  outputs = { self, nixpkgs, flake-utils }:
    flake-utils.lib.eachDefaultSystem (system:
      let
        pkgs = nixpkgs.legacyPackages.${system};

        libraries = with pkgs;[
          webkitgtk
          gtk3
          cairo
          gdk-pixbuf
          glib
          dbus
          openssl_3
          librsvg
        ];

        packages = with pkgs; [
          curl
          wget
          pkg-config
          dbus
          openssl_3
          glib
          gtk3
          libsoup
          webkitgtk
          librsvg
        ];
      in
      {
        devShell = pkgs.mkShell {
          buildInputs = packages;

          shellHook =
            ''
              export LD_LIBRARY_PATH=${pkgs.lib.makeLibraryPath libraries}:$LD_LIBRARY_PATH
            '';
        };
      });
}
If you don't use Nix Flakes, the [Nix Shell] can be configured using the following shell.nix script. Run nix-shell to activate the development environment, or use [direnv's Shell integration] to automatically start the dev shell when entering the project folder.let
  pkgs = import <nixpkgs> { };

  libraries = with pkgs;[
    webkitgtk
    gtk3
    cairo
    gdk-pixbuf
    glib
    dbus
    openssl_3
  ];

  packages = with pkgs; [
    pkg-config
    dbus
    openssl_3
    glib
    gtk3
    libsoup
    webkitgtk
    appimagekit
  ];
in
pkgs.mkShell {
  buildInputs = packages;

  shellHook =
    ''
      export LD_LIBRARY_PATH=${pkgs.lib.makeLibraryPath libraries}:$LD_LIBRARY_PATH
    '';
}- GNU Guix
To create Tauri development environments using [Guix shell], copy the following code into manifest.scm on your repository, then run guix shell to activate. You can also use [direnv's Guix shell support] to automatically start the Guix shell when entering the project folder.

(specifications->manifest
 (list "gtk+@3"
       "webkitgtk-with-libsoup2"
       "libsoup-minimal@2"
       "cairo"
       "gdk-pixbuf"
       "glib"
       "dbus"
       "openssl@3"
       "gcc:lib"

       "curl"
       "wget"
       "pkg-config"
"gsettings-desktop-schemas"))- Void
sudo apt update
sudo apt install libwebkit2gtk-4.0-dev \
    build-essential \
    curl \
    wget \
    libssl-dev \
    libgtk-3-dev \
    libayatana-appindicator3-dev \
    librsvg2-dev
2. Rust
要在 Linux 上安装 Rust,请打开终端并输入以下命令:
curl --proto '=https' --tlsv1.2 https://sh.rustup.rs -sSf | sh备注
我们已审计了此 Bash 脚本,它只做了该做的事情。 但是,您最好在复制粘贴运行脚本之前,看看其源代码。 这是它的源代码:rustup.sh
此命令将下载以上脚本并开始安装用来安装最新版 Rust 的 rustup 工具。 您可能需要输入密码。 若安装成功,终端将显示以下内容:
Rust is installed now. Great!请确保重新启动终端以使更改生效。
管理 Rust 安装
你应该保持更新你的 Rust 版本,以便使用最新改进。 若要更新 Rust,请打开终端并运行以下命令:
rustup updaterustup 也可以从您的计算机上完全卸载 Rust:
rustup self uninstall故障排查
要检查您是否正确安装了 Rust,请打开终端并运行如下命令:
rustc --version您应该能看到以下列格式呈现的版本号、提交哈希及提交日期:
rustc x.y.z (abcabcabc yyyy-mm-dd)若您没有看到此信息,则表示您的 Rust 安装可能存在问题。 请参阅 Rust 故障排查一节来了解如何解决此问题。 若您的问题仍然存在,您可以从 Tauri 官方 Discord 及 GitHub 讨论处获得帮助。