WebGL 2D 矩阵
WebGL 2D 矩阵
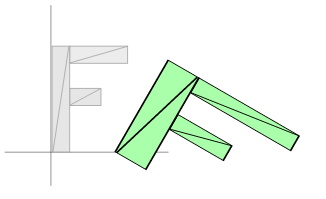
在前面三篇文章中我们讲解了如何平移几何图形,如何旋转几何图形,如何伸缩变换图形。平移,旋转和伸缩都被认为是一种变化类型。每一种变化都需要改变渲染器,而且他们依赖于操作的顺序。在前面的例子中我们进行了伸缩,旋转和平移操作。如果他们执行操作的顺序改变将会得到不同的结果。例如 XY 伸缩变换为 2,1,旋转 30%,接着平移变换 100,0。

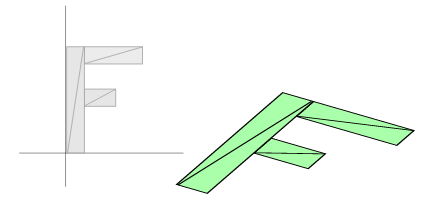
如下是平移 100,0,旋转 30%,接着伸缩变换 2,1。

结果是完全不同的。更糟糕的是,如果我们需要得到的是第二个示例的效果,就必须编写一个不同的渲染器,按照我们想要的执行顺序进行平移,旋转和伸缩变换。
然而,有些比我聪明的人利用数学中的矩阵能够解决上面这个问题。对于 2d 图形,使用一个 3X3 的矩阵。3X3 的矩阵类似了 9 宫格。

数学中的操作是与列相乘然后把结果加在一起。一个位置有两个值,用 x 和 y 表示。但是为了实现这个需要三个值,因为我们对第三个值设为 1。
在上面的例子中就变成了:

对于上面的处理你也许会想“这样处理的原因在哪里”。假设要执行平移变换。我们将想要执行的平移的总量为 tx 和 ty。构造如下的矩阵:

接着进行计算:

如果你还记得代数学,就可以那些乘积结果为零的位置。乘以 1 的效果相当于什么都没做,那么将计算简化看看发生了什么:

或者更简洁的方式:
newX = x + tx;
newY = y + ty;
extra 变量我们并不用在意。这个处理和我们在平移中编写的代码惊奇的相似。
同样地,让我们看看旋转。正如在旋转那篇中指出当我们想要进行旋转的时候,我们只需要角度的 sine 和 cosine 值。
s = Math.sin(angleToRotateInRadians);
c = Math.cos(angleToRotateInRadians);
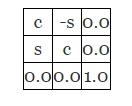
构造如下的矩阵:

执行上面的矩形操作:

将得到 0 和 1 结果部分用黑色块表示了。

同样可以简化计算:
newX = x * c + y * s;
newY = x * -s + y * c;
上面处理的结果刚好和旋转例子效果一样。
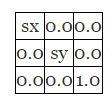
最后是伸缩变换。称两个伸缩变换因子为 sx 和 sy。
构造如下的矩阵:

进行矩阵操作会得到如下:

实际需要计算:

简化为:
newX = x * sx;
newY = y * sy;
和我们以前讲解的伸缩示例是一样的。
到了这里,我坚信你仍然在思考,这样处理之后了?有什么意义。看起来好象它只是做了和我们以前一样的事。
接下来就是魔幻的地方。已经被证明了我们可以将多个矩阵乘在一起,接着一次执行完所有的变换。假设有函数 matrixMultiply,它带两个矩阵做参数,将他们俩相乘,返回乘积结果。
为了让上面的做法更清楚,于是编写如下的函数构建一个用来平移,旋转和伸缩的矩阵:
function makeTranslation(tx, ty) {
  return [
    1, 0, 0,
    0, 1, 0,
    tx, ty, 1
  ];
}

function makeRotation(angleInRadians) {
  var c = Math.cos(angleInRadians);
  var s = Math.sin(angleInRadians);
  return [
    c,-s, 0,
    s, c, 0,
    0, 0, 1
  ];
}

function makeScale(sx, sy) {
  return [
    sx, 0, 0,
    0, sy, 0,
    0, 0, 1
  ];
}
接下来,修改渲染器。以往的渲染器是如下的形式:
<script id="2d-vertex-shader" type="x-shader/x-vertex">
attribute vec2 a_position;

uniform vec2 u_resolution;
uniform vec2 u_translation;
uniform vec2 u_rotation;
uniform vec2 u_scale;

void main() {
// Scale the positon
vec2 scaledPosition = a_position * u_scale;

// Rotate the position
vec2 rotatedPosition = vec2(
scaledPosition.x * u_rotation.y + scaledPosition.y * u_rotation.x,
scaledPosition.y * u_rotation.y - scaledPosition.x * u_rotation.x);

// Add in the translation.
vec2 position = rotatedPosition + u_translation;
...
新的渲染器将会变得更简单:
<script id="2d-vertex-shader" type="x-shader/x-vertex">
attribute vec2 a_position;

uniform vec2 u_resolution;
uniform mat3 u_matrix;

void main() {
// Multiply the position by the matrix.
vec2 position = (u_matrix * vec3(a_position, 1)).xy;
...
如下是我们使用它的方式:
// Draw the scene.
  function drawScene() {
    // Clear the canvas.
    gl.clear(gl.COLOR_BUFFER_BIT);

    // Compute the matrices
    var translationMatrix = makeTranslation(translation[0], translation[1]);
    var rotationMatrix = makeRotation(angleInRadians);
    var scaleMatrix = makeScale(scale[0], scale[1]);

    // Multiply the matrices.
    var matrix = matrixMultiply(scaleMatrix, rotationMatrix);
    matrix = matrixMultiply(matrix, translationMatrix);

    // Set the matrix.
    gl.uniformMatrix3fv(matrixLocation, false, matrix);

    // Draw the rectangle.
    gl.drawArrays(gl.TRIANGLES, 0, 18);
  }
如下是使用新的代码的示例。平移,旋转和伸缩滑动条是一样的。但是他们在渲染器上应用的更简单。
此时,你仍然会问,之后了?这个看起来并没有方便多少。然而,此时如果你想改变执行的顺序,就不再需要编写一个新的渲染器了。我们仅仅只需要改变数序公式。
  ...
    // Multiply the matrices.
    var matrix = matrixMultiply(translationMatrix, rotationMatrix);
    matrix = matrixMultiply(matrix, scaleMatrix);
    ...
如下是新版本:
能够按照这种方式执行矩阵操作是特别重要的,特别是对于层级动画的实现比如身体上手臂的,在一个星球上看月球同时在围绕着太阳旋转,或者数上的树枝等都是很重要的。举一个简单的层级动画例子,现在想要绘制 5 次 ‘F’,但是每次绘制是从上一个 ‘F’ 开始的。
  // Draw the scene.
  function drawScene() {
    // Clear the canvas.
    gl.clear(gl.COLOR_BUFFER_BIT);

    // Compute the matrices
    var translationMatrix = makeTranslation(translation[0], translation[1]);
    var rotationMatrix = makeRotation(angleInRadians);
    var scaleMatrix = makeScale(scale[0], scale[1]);

    // Starting Matrix.
    var matrix = makeIdentity();

    for (var i = 0; i < 5; ++i) {
      // Multiply the matrices.
      matrix = matrixMultiply(matrix, scaleMatrix);
      matrix = matrixMultiply(matrix, rotationMatrix);
      matrix = matrixMultiply(matrix, translationMatrix);

      // Set the matrix.
      gl.uniformMatrix3fv(matrixLocation, false, matrix);

      // Draw the geometry.
      gl.drawArrays(gl.TRIANGLES, 0, 18);
    }
  }
为了实现这个,我们要编写自己的函数 makeIdentity,这个函数返回单位矩阵。单位矩阵实际上表示的类似于 1.0 的矩阵,如果一个矩阵乘以单位矩阵,那么得到的还是原先那个矩阵。就如:
X*1 = X同样:
matrixX*identity = matrixX如下是构造单位矩阵的代码:
function makeIdentity() {
  return [
    1, 0, 0,
    0, 1, 0,
    0, 0, 1
  ];
}
如下是 5 个 F:
再来一个示例,在前面示例中,‘F’ 旋转总是绕坐上角。这是因为我们使用的数学方法总是围着源点旋转,并且 ‘F’ 的左上角就是原点,(0,0)。
但是现在,因为我们能够使用矩阵,那么就可以选择变化的顺序,可以在执行其他的变换之前先移动原点。
 // make a matrix that will move the origin of the 'F' to its center.
    var moveOriginMatrix = makeTranslation(-50, -75);
    ...

    // Multiply the matrices.
    var matrix = matrixMultiply(moveOriginMatrix, scaleMatrix);
    matrix = matrixMultiply(matrix, rotationMatrix);
    matrix = matrixMultiply(matrix, translationMatrix);
如下所示,注意 F 可以围着中心点进行旋转和伸缩。
使用如上的方法,你可以围着任何点进行旋转或者伸缩。现在你就明白了 Photoshop 或者 Flash 中实现绕某点旋转的原理。
让我们学习更深入点。如果你回到本系列的第一篇文章 WebGL 基本原理,你也许还记得我们编写的渲染器的代码中将像素转换成投影空间,如下所示:
  ...
  // convert the rectangle from pixels to 0.0 to 1.0
  vec2 zeroToOne = position / u_resolution;

  // convert from 0->1 to 0->2
  vec2 zeroToTwo = zeroToOne * 2.0;

  // convert from 0->2 to -1->+1 (clipspace)
  vec2 clipSpace = zeroToTwo - 1.0;

  gl_Position = vec4(clipSpace * vec2(1, -1), 0, 1);
如果你现在反过来看下每一步,第一步,“将像素变换成 0.0 变成 1.0”,其实是一个伸缩操作。第二步同样是伸缩变换。接下来是平移变换,并且 Y 的伸缩因子是 -1。我们可以通过将该矩阵传给渲染器实现上面的所有操作。可以构造二维伸缩矩阵,其中一个伸缩因子设置为 1.0/分辨率,另外一个伸缩因子设置为 2.0,第三个使用 -1.0,-1.0 来进行移动,并且第四个设置伸缩因子 Y 为 -1,接着将他们乘在一起,然而,因为数学是很容易的,我们仅仅只需编写一个函数,能够直接将给定的分辨率转换成投影矩阵。
function make2DProjection(width, height) {
  // Note: This matrix flips the Y axis so that 0 is at the top.
  return [
    2 / width, 0, 0,
    0, -2 / height, 0,
    -1, 1, 1
  ];
}
现在我们能进一步简化渲染器。如下是完整的顶点渲染器。
<script id="2d-vertex-shader" type="x-shader/x-vertex">
attribute vec2 a_position;

uniform mat3 u_matrix;

void main() {
// Multiply the position by the matrix.
gl_Position = vec4((u_matrix * vec3(a_position, 1)).xy, 0, 1);
}
</script>
在 JavaScript 中我们需要与投影矩阵相乘。
  // Draw the scene.
  function drawScene() {
    ...
    // Compute the matrices
    var projectionMatrix = make2DProjection(
        canvas.clientWidth, canvas.clientHeight);
    ...

    // Multiply the matrices.
    var matrix = matrixMultiply(scaleMatrix, rotationMatrix);
    matrix = matrixMultiply(matrix, translationMatrix);
    matrix = matrixMultiply(matrix, projectionMatrix);
    ...
  }
我们也移出了设置分辨率的代码。最后一步,通过使用数学矩阵就将原先需要 6-7 步操作复杂的渲染器变成仅仅只需要 1 步操作的更简单的渲染器。
希望这篇文章能够让你理解矩阵数学。接下来会讲解 3D 空间的知识。在 3D 中矩阵数学遵循同样的规律和使用方式。从 2D 开始讲解是希望让知识简单易懂。