WebGL 2D 图像转换
WebGL 2D 图像转换
在学习 3D 相关知识之前,请首先看看 2D 的知识。请保持耐心。这篇文章某些人看起来可能非常简单,但是我们将要讲解的知识是建立在前几篇的文章的基础之上。如果你没有阅读过,我建议你至少阅读第一章之后再回到这里继续学习。
Translation 指的是一些奇特的数学名称,它的基本意思是“移动”某物。它同样适用于将一个句子从英文“移动”成为日语这一说法,但是此处我们谈论的是几何中的移动。通过使用以 the first post 结尾的代码,你可以仅仅通过修改 setRectangle 距离右边的的值来使矩形移动。如下是一个基于我们初始示例的代码:
  // First lets make some variables
  // to hold the translation of the rectangle
  var translation = [0, 0];

  // then let's make a function to
  // re-draw everything. We can call this
  // function after we update the translation.

  // Draw a the scene.
  function drawScene() {
    // Clear the canvas.
    gl.clear(gl.COLOR_BUFFER_BIT);

    // Setup a rectangle
    setRectangle(gl, translation[0], translation[1], width, height);

    // Draw the rectangle.
    gl.drawArrays(gl.TRIANGLES, 0, 6);
  }
在上面的例子中,我在界面中放置了两个可滑动栏,你可以通过滑动按钮来修改 translation[0] 和 translation[1] 的值,而且在这个两个值发生修改时调用 drawScene 函数对界面进行更新。拖动滑动条对矩阵进行移动。
到此处你已经觉得很不错。然而,现在假设我们想要利用相同的操作,但是处理更复杂的图形,那么该如何实现了。
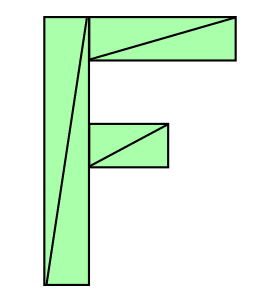
假设我们想要画一个包含 6 个三角形的 'F' 形状,如下所示:

如下是我们将要使用的改变 setRectangle 值的代码:
// Fill the buffer with the values that define a letter 'F'.
function setGeometry(gl, x, y) {
  var width = 100;
  var height = 150;
  var thickness = 30;
  gl.bufferData(
      gl.ARRAY_BUFFER,
      new Float32Array([
          // left column
          x, y,
          x + thickness, y,
          x, y + height,
          x, y + height,
          x + thickness, y,
          x + thickness, y + height,

          // top rung
          x + thickness, y,
          x + width, y,
          x + thickness, y + thickness,
          x + thickness, y + thickness,
          x + width, y,
          x + width, y + thickness,

          // middle rung
          x + thickness, y + thickness * 2,
          x + width * 2 / 3, y + thickness * 2,
          x + thickness, y + thickness * 3,
          x + thickness, y + thickness * 3,
          x + width * 2 / 3, y + thickness * 2,
          x + width * 2 / 3, y + thickness * 3]),
      gl.STATIC_DRAW);
}
你会发现画出来的图形伸缩比例不是很好。如果你想画出有几百或者几千条线组成的几何图形,我们就需要编写一些相当复杂的代码。在上面的代码中,每次用 JavaScript 就需要更新所有的点。
有一种更简单的方式。仅仅只需要更新几何图形,接着修改渲染器部分。
如下是渲染器部分:
<script id="2d-vertex-shader" type="x-shader/x-vertex">
attribute vec2 a_position;

uniform vec2 u_resolution;
uniform vec2 u_translation;

void main() {
   // Add in the translation.
   vec2 position = a_position + u_translation;

   // convert the rectangle from pixels to 0.0 to 1.0
   vec2 zeroToOne = position / u_resolution;
   ...
接着我们将会稍微重构下代码。我们仅仅需要设置几何图形一次。
// Fill the buffer with the values that define a letter 'F'.
function setGeometry(gl) {
  gl.bufferData(
      gl.ARRAY_BUFFER,
      new Float32Array([
          // left column
          0, 0,
          30, 0,
          0, 150,
          0, 150,
          30, 0,
          30, 150,

          // top rung
          30, 0,
          100, 0,
          30, 30,
          30, 30,
          100, 0,
          100, 30,

          // middle rung
          30, 60,
          67, 60,
          30, 90,
          30, 90,
          67, 60,
          67, 90]),
      gl.STATIC_DRAW);
}
在实现我们想要的移动之前需要更新下 u_translation 变量的值。
  ...
  var translationLocation = gl.getUniformLocation(
             program, "u_translation");
  ...
  // Set Geometry.
  setGeometry(gl);
  ..
  // Draw scene.
  function drawScene() {
    // Clear the canvas.
    gl.clear(gl.COLOR_BUFFER_BIT);

    // Set the translation.
    gl.uniform2fv(translationLocation, translation);

    // Draw the rectangle.
    gl.drawArrays(gl.TRIANGLES, 0, 18);
  }
注意 setGeometry 只是被调用一次。在 drawScene 中不需要。
如下是一个示例。同样,你可以通过拖动滑动条来更新图形的位置。
现在,当我们绘制 WebGL 图像就包括要实现上面所有的事。我们所作的所有事指的是设置移动变量接着调用函数进行绘制。即使我们的几何图形包含成千上万的点,main 代码仍然是相同的。