OpenCV Hough Circle 变换
目标
在本教程中,您将学习如何:
- 使用OpenCV函数cv :: HoughCircles来检测图像中的圆。
理论
Hough Circle变换
- Hough Circle变换的工作原理与上一个教程中解释的Hough Line变换大致相似。
- 在行检测案例中,一行由两个参数(r,θ)。在圆圈中,我们需要三个参数来定义一个圆:

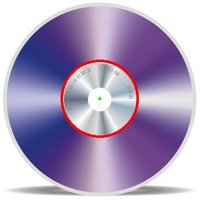
定义中心位置(绿点),r是半径,这允许我们完全定义一个圆,如下所示:

- 为了实现效率,OpenCV实现了一个比标准霍夫变换(Hough Transform)稍微棘手的检测方法:霍夫梯度法,由两个主要阶段组成。第一阶段涉及边缘检测并找到可能的圆心,第二阶段为每个候选中心找到最佳的半径。有关更多详细信息,请查看学习OpenCV或您最喜欢的计算机视觉参考书
Code
- 这个程序是做什么的?
- 加载图像并使其模糊,
- 以减少噪音将Hough Circle变换应用于模糊图像。
- 在窗口中显示检测到的圆。
- 我们将从这里下载我们将要解释的示例代码。这里可以找到一个稍微推荐的版本(显示用于更改阈值的轨迹条)。
#include "opencv2/imgcodecs.hpp"
#include "opencv2/highgui.hpp"
#include "opencv2/imgproc.hpp"
#include <iostream>
using namespace cv;
using namespace std;
static void help()
{
    cout << "\nThis program demonstrates circle finding with the Hough transform.\n"
            "Usage:\n"
            "./houghcircles <image_name>, Default is ../data/board.jpg\n" << endl;
}
int main(int argc, char** argv)
{
    cv::CommandLineParser parser(argc, argv,
        "{help h ||}{@image|../data/board.jpg|}"
    );
    if (parser.has("help"))
    {
        help();
        return 0;
    }
    string filename = parser.get<string>("@image");
    Mat img = imread(filename, IMREAD_COLOR);
    if(img.empty())
    {
        help();
        cout << "can not open " << filename << endl;
        return -1;
    }
    Mat gray;
    cvtColor(img, gray, COLOR_BGR2GRAY);
    medianBlur(gray, gray, 5);
    vector<Vec3f> circles;
    HoughCircles(gray, circles, HOUGH_GRADIENT, 1,
                 gray.rows/16, // change this value to detect circles with different distances to each other
                 100, 30, 1, 30 // change the last two parameters
                                // (min_radius & max_radius) to detect larger circles
                 );
    for( size_t i = 0; i < circles.size(); i++ )
    {
        Vec3i c = circles[i];
        circle( img, Point(c[0], c[1]), c[2], Scalar(0,0,255), 3, LINE_AA);
        circle( img, Point(c[0], c[1]), 2, Scalar(0,255,0), 3, LINE_AA);
    }
    imshow("detected circles", img);
    waitKey();
    return 0;
}
说明
- 加载图像
    string filename = parser.get<string>("@image");
    Mat img = imread(filename, IMREAD_COLOR);
    if(img.empty())
    {
        help();
        cout << "can not open " << filename << endl;
        return -1;
}- 将其转换为灰度:
    Mat gray;
cvtColor(img, gray, COLOR_BGR2GRAY);- 应用中值模糊以减少噪音,避免假圈检测:
medianBlur(gray, gray, 5);
继续应用Hough Circle变换:
    vector<Vec3f> circles;
    HoughCircles(gray, circles, HOUGH_GRADIENT, 1,
                 gray.rows/16, // change this value to detect circles with different distances to each other
                 100, 30, 1, 30 // change the last two parameters
                                // (min_radius & max_radius) to detect larger circles
                 );
有论据:
- gray:输入图像(灰度)。
- circles:存储套3个的值的矢量:为每个检测到的圆。xc,yc,r
- HOUGH_GRADIENT:定义检测方法。目前这是OpenCV中唯一可用的。
- dp = 1:分辨率的反比。
- min_dist = gray.rows / 16:检测到的中心之间的最小距离。
- param_1 = 200:内部Canny边缘检测器的上限阈值。
- param_2 = 100 *:中心检测阈值。
- min_radius = 0:要检测的最小半径。如果未知,则将零置为默认值。
- max_radius = 0:要检测的最大半径。如果未知,则将零置为默认值。
- 绘制检测到的圆:
    for( size_t i = 0; i < circles.size(); i++ )
    {
        Vec3i c = circles[i];
        circle( img, Point(c[0], c[1]), c[2], Scalar(0,0,255), 3, LINE_AA);
        circle( img, Point(c[0], c[1]), 2, Scalar(0,255,0), 3, LINE_AA);
    }
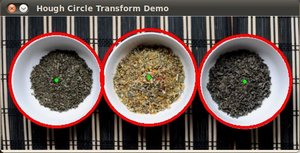
你可以看到,我们将用红色圆圈和中心绘制一个小绿点
- 显示检测到的圆,并等待用户退出程序:
    imshow("detected circles", img);
    waitKey();
结果
使用测试图像运行代码的结果如下所示:
