
与OpenCV 1的互操作性
目标
对于OpenCV开发团队来说,不断改进库是很重要的。我们一直在思考可以缓解工作流程的方法,同时保持库的灵活性。新的C ++接口是我们的一个发展,服务于这个目标。然而,向后兼容仍然很重要。我们不想打破为早期版本的OpenCV库编写的代码。因此,我们确保添加了一些处理此功能的功能。在下面你会学到:
- 与其第一个版本相比,使用该库的方式与OpenCV的版本2发生了什么变化
- 如何向图像添加一些高斯噪声
- 什么是查找表,为什么使用它们?
General
在进行切换时,首先需要了解有关图像的新数据结构:Mat - Basic Image Container,这取代了旧的CvMat和IplImage。切换到新功能更容易。你只需要记住几件新事物。
OpenCV 2收到重组。所有的功能不再被压缩到一个库中。我们有很多模块,每个模块都包含与某些任务相关的数据结构和功能。这样,如果您仅使用OpenCV的一个子集,则不需要运送大型库。这意味着你也应该只包括你将使用的标题。例如
#include < opencv2 / core.hpp >
#include < opencv2 / imgproc.hpp >
#include < opencv2 / highgui.hpp >所有与OpenCV相关的内容都放在cv命名空间中,以避免与其他库数据结构和函数的名称冲突。因此,您需要在来自OpenCV的所有内容之前或之后添加cv ::关键字,只需添加一个使用此指令的指令即可:
using namespace cv; // The new C++ interface API is inside this namespace. Import it.
因为这些函数已经在命名空间中,所以不需要在它们的名称中包含cv前缀。因此,所有新的C ++兼容功能都没有这个,它们遵循骆驼案例命名规则。这意味着第一个字母很小(除非是像Canny这样的名字),后续的单词将以大写字母(如copyMakeBorder)开头。
现在,请记住,您需要链接到应用程序所有使用的模块,如果您在Windows上使用DLL系统,您将需要再次添加所有二进制文件的路径。有关更多深入的信息,如果您在Windows上阅读如何使用OpenCV在“Microsoft Visual Studio”和Linux中构建应用程序,使用OpenCV与Eclipse(插件CDT)一起解释了一个示例用法。
现在转换Mat对象可以使用IplImage或CvMat操作符。在C界面中,您曾经在这里使用指针,不再是这样。在C ++界面中,我们主要使用Mat对象。这些对象可以通过简单的赋值自由转换为IplImage和CvMat。例如:
Mat I;
IplImage pI = I;
CvMat mI = I;现在,如果你想要指针,转换就会变得更复杂一些。编译器不能再自动确定您想要什么,并且您需要明确指定您的目标。这是调用IplImage和CvMat操作符,然后获取它们的指针。为了得到指针,我们使用&sign:
Mat I;
IplImage* pI     = &I.operator IplImage();
CvMat* mI = &I.operator CvMat();现在,你的基础知识做了这里的一个例子,将C接口与C++的用法。您需要弄清楚什么时候可以安全释放未使用的对象,并确保在程序完成之前这样做,否则您可能会遇到麻烦的记忆韭菜。要解决OpenCV中的这个问题,引入了一种智能指针。当它不再使用时,它将自动释放对象。要使用它,将该指针声明为Ptr的专业化:
Ptr<IplImage> piI = &I.operator IplImage();
从C数据结构到Mat的转换是通过将这些内容传递给它的构造函数来实现的。例如:
Mat K(piL),L;
L = Mat(pI);
案例研究
现在,您在这里完成的基础是将C接口的使用与C ++的使用相结合的示例。您还将在OpenCV源代码库的示例目录中找到它samples/cpp/tutorial_code/core/interoperability_with_OpenCV_1/interoperability_with_OpenCV_1.cpp。为了进一步帮助看到差异,程序支持两种模式:一种混合C和C ++和一种纯C ++。如果您定义了DEMO_MIXED_API_USE,则最终将使用第一个。程序分离色平面,对它们进行一些修改,最终将它们合并在一起。
#include <iostream>
#include <opencv2/imgproc.hpp>
#include "opencv2/imgcodecs.hpp"
#include <opencv2/highgui.hpp>
using namespace cv;  // The new C++ interface API is inside this namespace. Import it.
using namespace std;
// comment out the define to use only the latest C++ API
#define DEMO_MIXED_API_USE
#ifdef DEMO_MIXED_API_USE
# include <opencv2/highgui/highgui_c.h>
# include <opencv2/imgcodecs/imgcodecs_c.h>
#endif
int main( int argc, char** argv )
{
help(argv[0]);
const char* imagename = argc > 1 ? argv[1] : "../data/lena.jpg";
#ifdef DEMO_MIXED_API_USE
Ptr<IplImage> IplI(cvLoadImage(imagename)); // Ptr<T> is a safe ref-counting pointer class
if(!IplI)
{
cerr << "Can not load image " << imagename << endl;
return -1;
}
Mat I = cv::cvarrToMat(IplI); // Convert to the new style container. Only header created. Image not copied.
#else
Mat I = imread(imagename); // the newer cvLoadImage alternative, MATLAB-style function
if( I.empty() ) // same as if( !I.data )
{
cerr << "Can not load image " << imagename << endl;
return -1;
}
#endif在这里,您可以观察到,使用新的结构,我们没有指针问题,尽管可以使用旧的函数,最终只是将结果转换为Mat对象。
    // convert image to YUV color space. The output image will be created automatically.
    Mat I_YUV;
    cvtColor(I, I_YUV, COLOR_BGR2YCrCb);
    vector<Mat> planes;    // Use the STL's vector structure to store multiple Mat objects
    split(I_YUV, planes);  // split the image into separate color planes (Y U V)
因为,我们想要混淆我们首先从默认BGR转换为YUV颜色空间的图像亮度分量,然后将结果分割成单独的平面。这里的程序分裂:在第一个例子中,它使用OpenCV(C []运算符,迭代器,单个元素访问中的三种主要图像扫描算法之一来处理每个平面)。在第二个变体中,我们向图像添加一些高斯噪声,然后根据一些公式将信道混合在一起。
扫描版本如下所示:
    // Mat scanning
    // Method 1. process Y plane using an iterator
    MatIterator_<uchar> it = planes[0].begin<uchar>(), it_end = planes[0].end<uchar>();
    for(; it != it_end; ++it)
    {
        double v = *it * 1.7 + rand()%21 - 10;
        *it = saturate_cast<uchar>(v*v/255);
    }
    for( int y = 0; y < I_YUV.rows; y++ )
    {
        // Method 2. process the first chroma plane using pre-stored row pointer.
        uchar* Uptr = planes[1].ptr<uchar>(y);
        for( int x = 0; x < I_YUV.cols; x++ )
        {
            Uptr[x] = saturate_cast<uchar>((Uptr[x]-128)/2 + 128);
            // Method 3. process the second chroma plane using individual element access
            uchar& Vxy = planes[2].at<uchar>(y, x);
            Vxy =        saturate_cast<uchar>((Vxy-128)/2 + 128);
        }
    }
在这里,您可以观察到,我们可以以三种方式浏览图像的所有像素:迭代器,C指针和单个元素访问样式。您可以在“ 如何使用OpenCV教程扫描图像,查找表格和时间测量”中阅读更深入的描述。从旧的函数名转换很容易。只需删除cv前缀并使用新的Mat数据结构。以下是使用加权加法函数的例子:
    Mat noisyI(I.size(), CV_8U);           // Create a matrix of the specified size and type
    // Fills the matrix with normally distributed random values (around number with deviation off).
    // There is also randu() for uniformly distributed random number generation
    randn(noisyI, Scalar::all(128), Scalar::all(20));
    // blur the noisyI a bit, kernel size is 3x3 and both sigma's are set to 0.5
    GaussianBlur(noisyI, noisyI, Size(3, 3), 0.5, 0.5);
    const double brightness_gain = 0;
    const double contrast_gain = 1.7;
#ifdef DEMO_MIXED_API_USE
    // To pass the new matrices to the functions that only work with IplImage or CvMat do:
    // step 1) Convert the headers (tip: data will not be copied).
    // step 2) call the function   (tip: to pass a pointer do not forget unary "&" to form pointers)
    IplImage cv_planes_0 = planes[0], cv_noise = noisyI;
    cvAddWeighted(&cv_planes_0, contrast_gain, &cv_noise, 1, -128 + brightness_gain, &cv_planes_0);
#else
    addWeighted(planes[0], contrast_gain, noisyI, 1, -128 + brightness_gain, planes[0]);
#endif
    const double color_scale = 0.5;
    // Mat::convertTo() replaces cvConvertScale.
    // One must explicitly specify the output matrix type (we keep it intact - planes[1].type())
    planes[1].convertTo(planes[1], planes[1].type(), color_scale, 128*(1-color_scale));
    // alternative form of cv::convertScale if we know the datatype at compile time ("uchar" here).
    // This expression will not create any temporary arrays ( so should be almost as fast as above)
    planes[2] = Mat_<uchar>(planes[2]*color_scale + 128*(1-color_scale));
    // Mat::mul replaces cvMul(). Again, no temporary arrays are created in case of simple expressions.
planes[0] = planes[0].mul(planes[0], 1./255);您可能会看到,平面变量是Mat类型。然而,从Mat转换为IplImage是容易的,并使用简单的赋值运算符自动进行。
    merge(planes, I_YUV);                // now merge the results back
    cvtColor(I_YUV, I, COLOR_YCrCb2BGR);  // and produce the output RGB image
    namedWindow("image with grain", WINDOW_AUTOSIZE);   // use this to create images
#ifdef DEMO_MIXED_API_USE
    // this is to demonstrate that I and IplI really share the data - the result of the above
    // processing is stored in I and thus in IplI too.
    cvShowImage("image with grain", IplI);
#else
    imshow("image with grain", I); // the new MATLAB style function show
#endif
新的imshow highgui函数接受Mat和IplImage数据结构。编译并运行程序,如果下面的第一个图像是您的输入,您可以获得第一个或第二个输出:
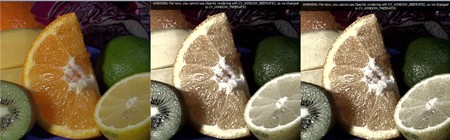
您可以从这里下载源代码,或者samples/cpp/tutorial_code/core/interoperability_with_OpenCV_1/interoperability_with_OpenCV_1.cpp在OpenCV源代码库中找到它.