
百度智能小程序 相机
camera 相机
解释:系统相机,使用该组件需通过获取用户授权设置申请授权后方可对用户发起授权申请,可在 swan.authorize 中查看相关错误码信息。camera 组件还提供丰富的 api 来控制相机录像、拍照等,详见 swan.createCameraContext。
属性说明
| 属性名 | 类型 | 默认值 | 必填 | 说明 |
|---|---|---|---|---|
|
device-position |
String |
back |
否 |
前置或后置,值为 front, back |
|
flash |
String |
auto |
否 |
闪光灯,值为 auto, on, off |
|
bindstop |
EventHandle |
否 |
摄像头在非正常终止时触发,如退出后台等情况 |
|
|
binderror |
EventHandle |
否 |
用户不允许使用摄像头时触发 |
device-position 有效值
| 值 | 说明 |
|---|---|
|
front |
前置摄像头 |
|
back |
后置摄像头 |
flash 有效值
| 值 | 说明 |
|---|---|
|
auto |
自动闪光灯 |
|
on |
闪光灯开 |
|
off |
闪光灯关 |
示例

代码示例
<view class="wrap">
    <view class="card-area">
        <camera device-position="{{device}}"
                flash="off"
                bindstop="stop"
                binderror="error"
                style="width: 100%; height: 3rem;">
        </camera>
        <button type="primary" bind:tap="switchCamera">切换摄像头</button>
        <button type="primary" bind:tap="takePhoto">拍照</button>
        <button type="primary" bind:tap="startRecord">开始录像</button>
        <button type="primary" bind:tap="stopRecord">结束录像</button>
        <!-- <navigator url="/pages/camera-scan-code/camera-scan-code">
            <button type="primary">扫描一维码</button>
        </navigator> -->
        <view class="preview">预览</view>
        <image s-if="imageSrc" class="image" mode="widthFix" src="{{imageSrc}}"></image>
        <video s-if="videoSrc" class="video" src="{{videoSrc}}"></video>
    </view>
</view>
Page({
data: {
imageSrc: '',
device: 'back',
videoSrc: ''
},
switchCamera() {
const devices = this.getData('device');
if (devices === 'back') {
this.setData({
device: 'front'
});
} else {
this.setData({
device: 'back'
});
}
},
takePhoto() {
const ctx = swan.createCameraContext();
ctx.takePhoto({
quality: 'high',
success: res => {
this.setData({
imageSrc: res.tempImagePath
});
}
});
},
startRecord() {
const ctx = swan.createCameraContext();
ctx.startRecord({
success: res => {
swan.showToast({
title: 'startRecord',
icon: 'none'
});
}
});
},
stopRecord() {
const ctx = swan.createCameraContext();
ctx.stopRecord({
success: res => {
swan.showModal({
title: '提示',
content: res.tempVideoPath
});
this.setData({
videoSrc: res.tempVideoPath
});
}
});
},
error(e) {
console.log(e.detail);
}
});设计指南
如未获取相机权限致使相机无法使用,可通过模态弹窗(showModal)进行明确的提示反馈,避免相机黑屏阻断流程,影响用户体验。
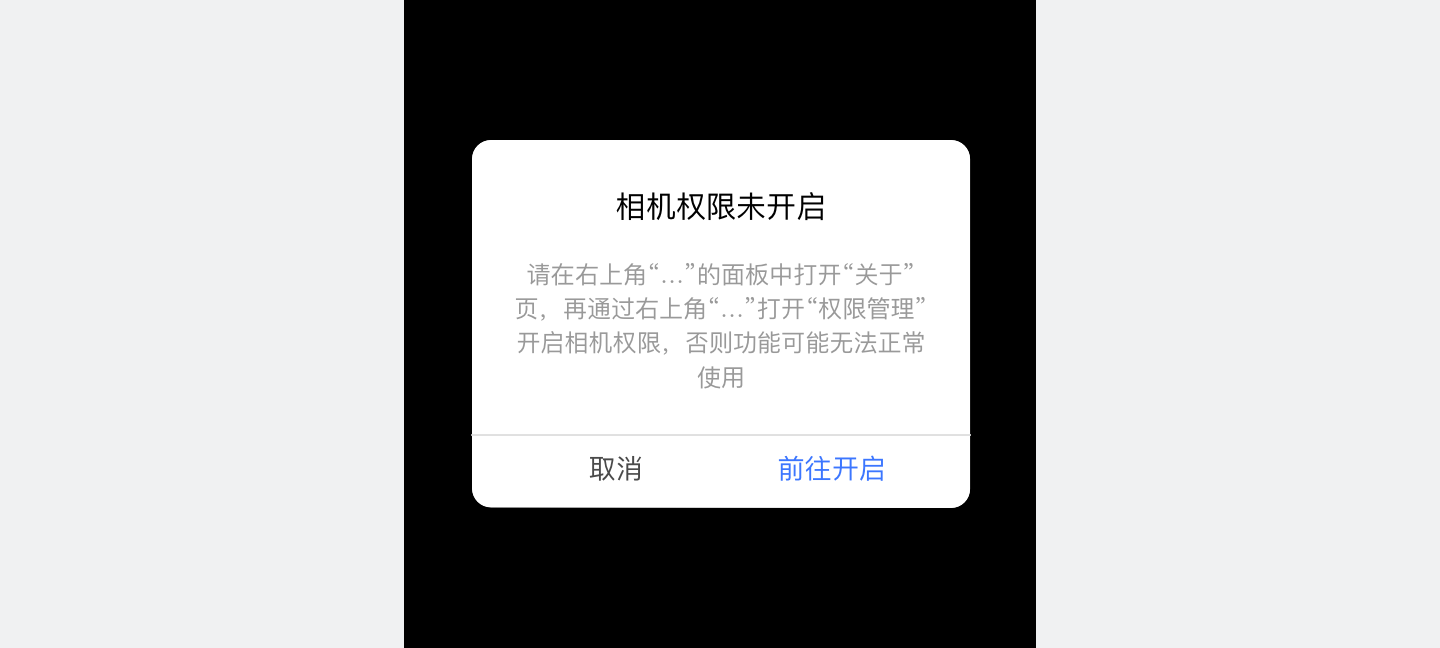
正确
未获取相机权限时提示用户权限未开启

错误
未获取相机权限却无提示,导致用户无措
Bug & Tip
- Tip:camera 组件是由客户端创建的原生组件,它的层级是最高的,不能通过 z-index 控制层级。可使用 cover-view cover-image 覆盖在上面(在基础库 3.0.0 之前需要先创建 camera,再通过的方式方 s-if="{ {true} }"可在 camera 上创建 NA 组件)。Tip:同一页面只能插入一个 camera 组件。Tip:请勿在 scroll-view、swiper、picker-view、movable-view 中使用 camera 组件。Tip:相关 API:createCameraContext。